<?xml version="1.0" encoding="utf-8"?><feed xmlns="http://www.w3.org/2005/Atom" xml:lang="fr"><generator uri="https://jekyllrb.com/" version="3.10.0">Jekyll</generator><link href="https://www.reau.ca/feed/Tutorials.xml" rel="self" type="application/atom+xml" /><link href="https://www.reau.ca/" rel="alternate" type="text/html" hreflang="fr" /><updated>2026-03-18T10:58:55+00:00</updated><id>https://www.reau.ca/feed/Tutorials.xml</id><title type="html">reau.ca | Tutorials</title><subtitle>Geoff RÉAU is a confirmed Technology Delivery Lead with 20+ years of experience in Infrastructure Technology. From Design to Delivery and beyond, Geoff is dedicated to supporting clients every step of the way, ensuring trust and delivering impactful technology solutions.</subtitle><author><name>Geoff RÉAU</name><email>contact@reau.ca</email></author><entry xml:lang="en"><title type="html">Thunkable Tuto (2/2): Make your mobile app smart with the Google Gemini API</title><link href="https://www.reau.ca/2026/03/18/thunkable-tuto-part-2.html" rel="alternate" type="text/html" title="Thunkable Tuto (2/2): Make your mobile app smart with the Google Gemini API" /><published>2026-03-18T10:00:00+00:00</published><updated>2026-03-18T10:00:00+00:00</updated><id>https://www.reau.ca/2026/03/18/thunkable-tuto-part-2</id><content type="html" xml:base="https://www.reau.ca/2026/03/18/thunkable-tuto-part-2.html"><![CDATA[<p><img src="/content/images/thunkable-tuto-part2.jpg" alt="Thunkable Tuto - Integrate Gemini API" style="display: block; margin: 0 auto;" /></p>

<p>In <strong><a href="/2026/03/13/thunkable-tuto-part-1.html">the first part of this tutorial</a></strong>, we connected our mobile prototype to a Firebase database. This is a great practice, especially relevant if you plan to transition to coding with frameworks like React Native later on. However, this approach keeps us dependent on a pre-filled database.</p>

<p>Today, we are shifting into high gear. After 20 years in the IT industry, I am still fascinated by how easily we can now integrate artificial intelligence into an app with just a few clicks. We are going to replace our static database with the Google Gemini API to generate 100% custom quotes on the fly!
<!--more--></p>

<hr />
<p><strong><em>Foreword</em></strong>: <em>This article, enhanced with improvements generated by AI (<a href="https://gemini.google.com/">Google Gemini</a>), is made available under the</em> <span xmlns:cc="http://creativecommons.org/ns#"><i><a href="https://creativecommons.org/licenses/by-nd/4.0/?ref=chooser-v1" target="_blank" rel="license noopener noreferrer" style="display:inline-block;">CC BY-ND 4.0<img style="height:22px!important;margin-left:3px;vertical-align:text-bottom;" src="https://mirrors.creativecommons.org/presskit/icons/cc.svg?ref=chooser-v1" alt="" /><img style="height:22px!important;margin-left:3px;vertical-align:text-bottom;" src="https://mirrors.creativecommons.org/presskit/icons/by.svg?ref=chooser-v1" alt="" /><img style="height:22px!important;margin-left:3px;vertical-align:text-bottom;" src="https://mirrors.creativecommons.org/presskit/icons/nd.svg?ref=chooser-v1" alt="" /></a></i></span></p>

<hr />

<h1 id="step-1-get-the-brains-keys-google-ai-studio">Step 1: Get the brain’s keys (Google AI Studio)</h1>
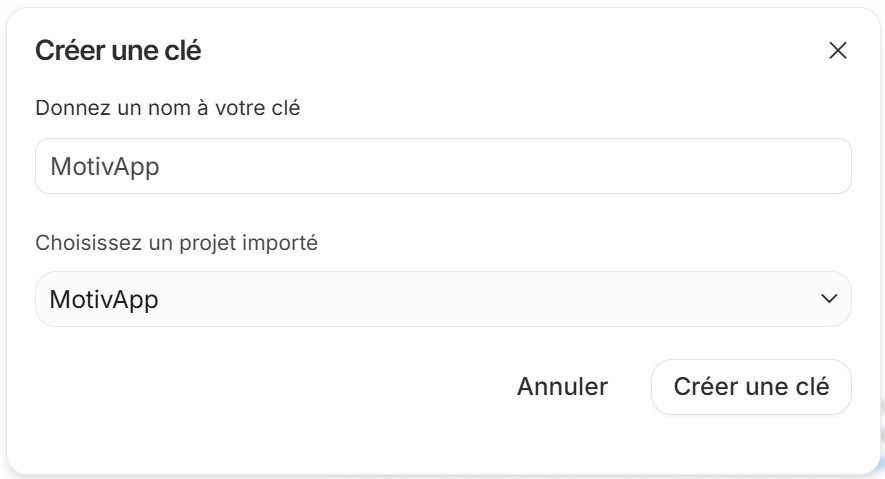
<p>To talk to Gemini from our app, we need a pass: an API key.</p>
<ul>
  <li>Go to <a href="https://aistudio.google.com/">Google AI Studio</a>.</li>
  <li>Sign in with your Google account.</li>
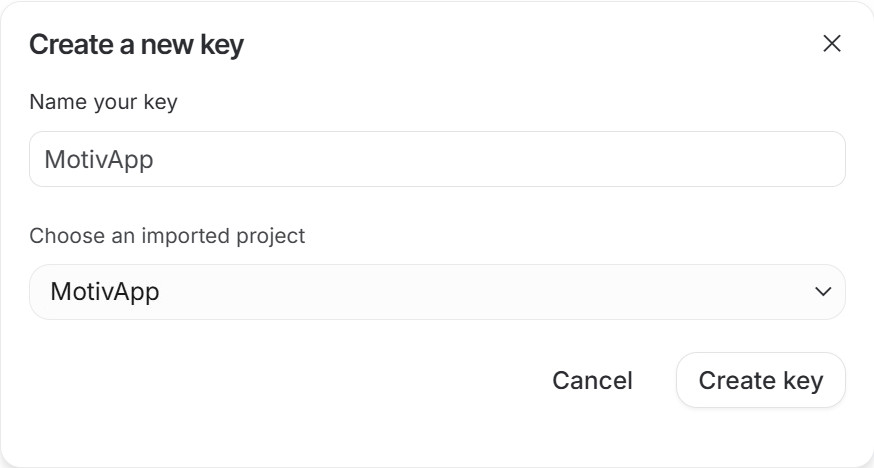
  <li>In the left menu, click on <strong>Get API key</strong> and then on the <strong>Create API key</strong> button.</li>
</ul>

<p><img src="/content/images/gemini_api_keygen_en.jpg" alt="Generate an API key on Google AI Studio" style="display: block; margin: 0 auto;" /><br /></p>

<ul>
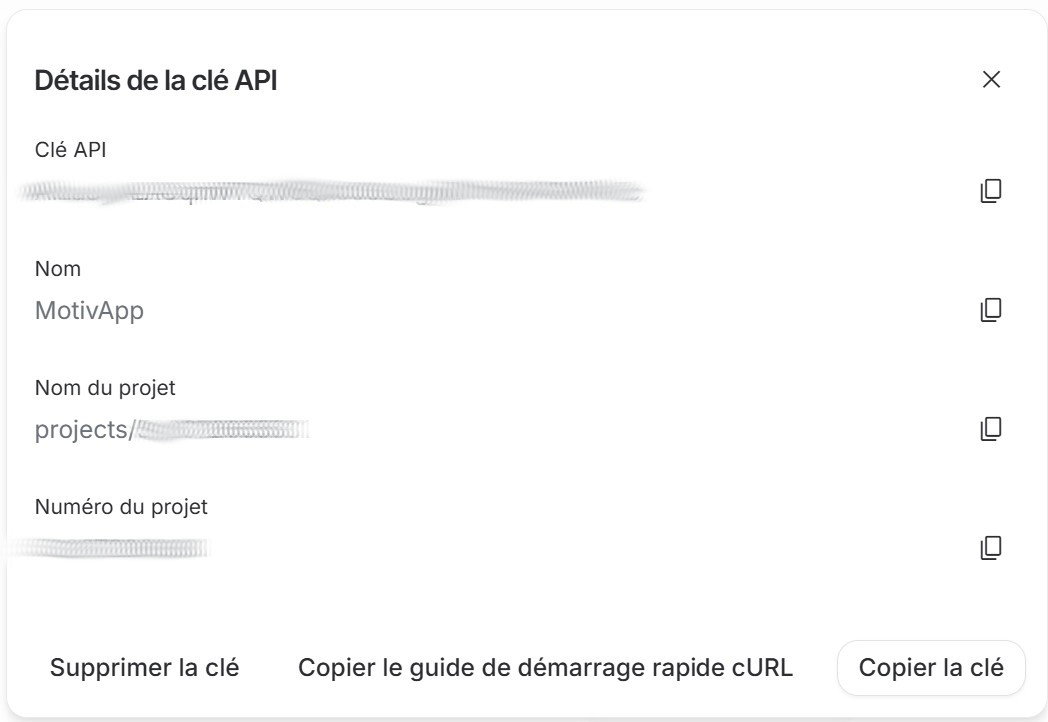
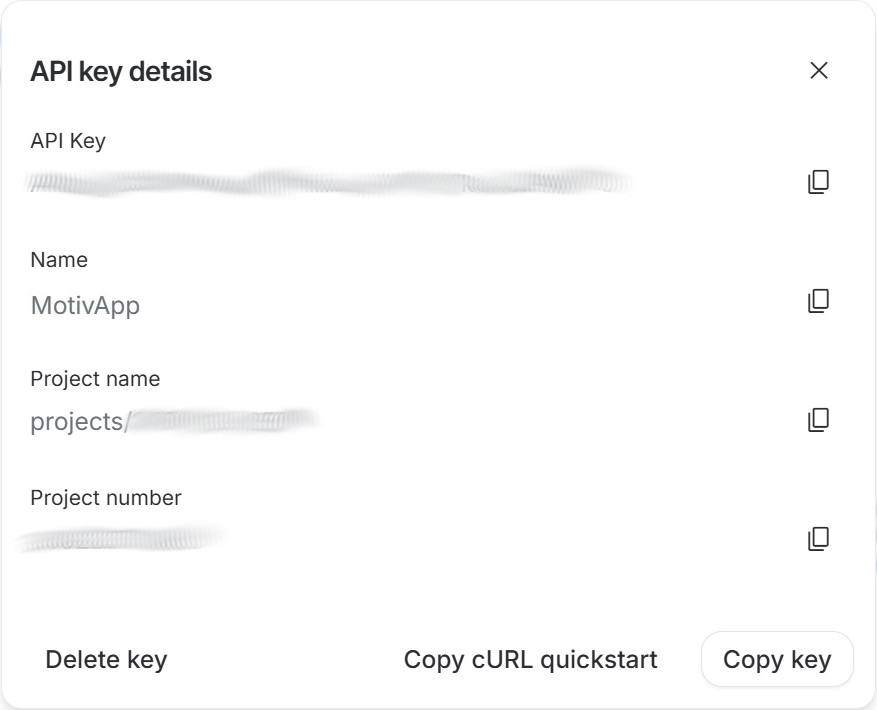
  <li>Once the API key is created, click on it to display it.</li>
  <li>Copy this long string of characters and keep it safe (never share it publicly).
<img src="/content/images/gemini_api_key_en.jpg" alt="Display an API key on Google AI Studio" style="display: block; margin: 0 auto;" /><br /></li>
</ul>

<h1 id="step-2-adapt-motivapps-design">Step 2: Adapt MotivApp’s Design</h1>
<p>Let’s pick up our Thunkable project where we left off. We are going to add some interactivity.</p>
<ul>
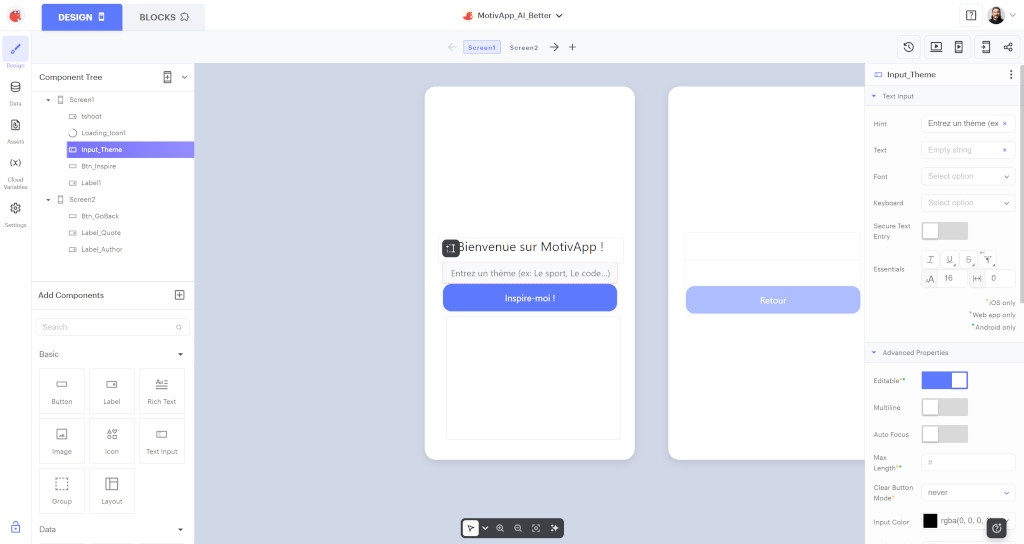
  <li><strong>On Screen1 (Home):</strong> Add a <strong>Text Input</strong> component right above the “Inspire me!” button. Change its <em>Hint</em> property to display: “Enter a theme (e.g., Sports, Coding…)”. Rename this component <code class="language-plaintext highlighter-rouge">Input_Theme</code>.
<img src="/content/images/thunkable_gemini_design.jpg" alt="Updated design with text input" style="display: block; margin: 0 auto;" /><br /></li>
</ul>

<h1 id="step-3-prompt-engineering-with-risen">Step 3: Prompt Engineering with RISEN</h1>
<p>This is the core of the reactor. To prevent the AI from rambling, we will structure our request (prompt) with the professional <strong>RISEN</strong> framework. Here is how we will constrain the <code class="language-plaintext highlighter-rouge">gemini-2.5-flash</code> model:</p>
<ul>
  <li><strong>R (Role):</strong> Act as an expert motivational life coach.</li>
  <li><strong>I (Instruction):</strong> Write an original motivational quote based on the following theme: [Theme typed by the user].</li>
  <li><strong>S (Steps):</strong> 1. Analyze the theme. 2. Find an inspiring angle. 3. Formulate the quote. 4. Attribute it to a fictional or real author.</li>
  <li><strong>E (End Goal):</strong> The reader must feel an immediate urge to take action.</li>
  <li><strong>N (Narrowing):</strong> The response MUST follow this strict format: ‘Quote - Author’. Do not exceed 20 words. Do not include any greetings.</li>
</ul>

<p>Here is exactly the final text our app will assemble, replacing the end <code class="language-plaintext highlighter-rouge">app</code> variable with the theme chosen by the user:</p>

<figure class="highlight"><pre><code class="language-text" data-lang="text">Act as an expert motivational life coach. 
Write an original motivational quote based on the following theme: [USER'S THEME]. 
1. Analyze the theme. 2. Find an inspiring angle. 3. Formulate the quote. 4. Attribute it to a fictional or real author. 
The reader must feel an immediate urge to take action. 
The response MUST follow this strict format: 'Quote - Author'. Do not exceed 20 words. Do not include any greetings.</code></pre></figure>

<h1 id="step-4-logic-and-blocks">Step 4: Logic and Blocks</h1>

<h2 id="on-screen1">On Screen1</h2>
<h3 id="blocks-overview">Blocks overview</h3>
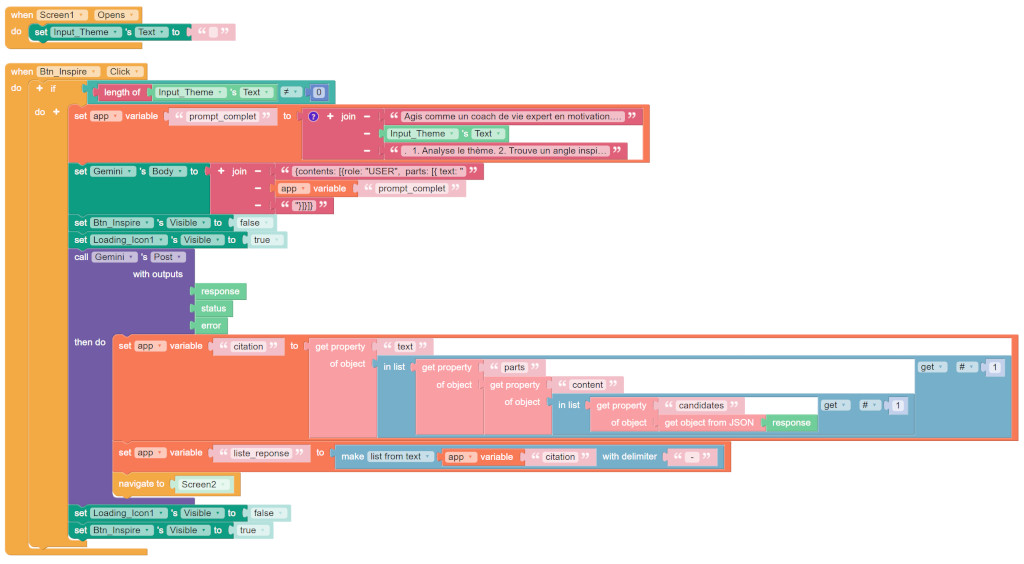
<p><img src="/content/images/thunkable_gemini_blocks_part1.jpg" alt="Screen1 Blocks overview" style="display: block; margin: 0 auto;" /><br /></p>

<h3 id="blocks-sequence">Blocks sequence</h3>

<p><strong>Initialisation</strong></p>
<ul>
  <li>When <code class="language-plaintext highlighter-rouge">Screen1</code> opens, empty the <code class="language-plaintext highlighter-rouge">Input_Theme</code>.</li>
  <li>When clicking on <code class="language-plaintext highlighter-rouge">Btn_Inspire</code>, we must check that the <code class="language-plaintext highlighter-rouge">Text</code> in the <code class="language-plaintext highlighter-rouge">Input_Theme</code> component is not empty before executing the next steps.</li>
</ul>

<p><strong>Building the API Request:</strong></p>
<ul>
  <li>
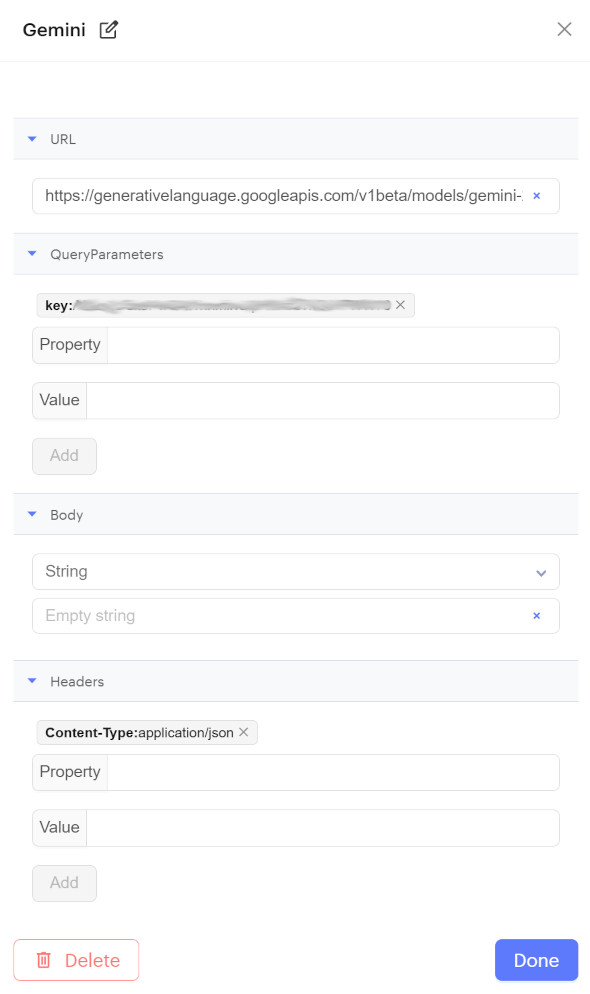
    <p>Create a <strong>Web API</strong> component : on the left list, uncollapse “Advanced”, then click on [+] at the right side of “Web APIs”. This will replace Firebase to communicate with Google’s servers.</p>

    <ul>
      <li>Rename it to <code class="language-plaintext highlighter-rouge">Gemini</code>.</li>
      <li>Configure the API URL: set the field “URL” to <code class="language-plaintext highlighter-rouge">https://generativelanguage.googleapis.com/v1beta/models/gemini-2.5-flash:generateContent</code>.</li>
      <li>Configure your API key:
        <ul>
          <li>Set the field “Property” to <code class="language-plaintext highlighter-rouge">key</code></li>
          <li>Paste your API key in the field “Value”.</li>
          <li>Click on [Add].</li>
        </ul>
      </li>
      <li>Setup the header:
        <ul>
          <li>Set the field “Property” to <code class="language-plaintext highlighter-rouge">Content-Type</code></li>
          <li>Set the field “Value” to <code class="language-plaintext highlighter-rouge">application/json</code>.</li>
          <li>Click on [Add].</li>
        </ul>
      </li>
      <li>Click on [Done].</li>
    </ul>
  </li>
</ul>

<p><img src="/content/images/thunkable_webapi_config.jpg" alt="WebAPI configuration" style="display: block; margin: 0 auto;" /><br /></p>

<p>The Gemini API is very strict about the data format it receives. It expects a JSON object containing a <code class="language-plaintext highlighter-rouge">contents</code> list, which itself contains a <code class="language-plaintext highlighter-rouge">parts</code> list, which finally contains the <code class="language-plaintext highlighter-rouge">text</code> attribute with our prompt. In Thunkable, the easiest way to build this request body is to use a text block.</p>

<ol>
  <li>First, create an <code class="language-plaintext highlighter-rouge">app</code> variable named <code class="language-plaintext highlighter-rouge">full_prompt</code> and use a <code class="language-plaintext highlighter-rouge">join</code> block to stick the large RISEN text block (seen in step 3) with the <code class="language-plaintext highlighter-rouge">Text</code> in the <code class="language-plaintext highlighter-rouge">Input_Theme</code> component.</li>
  <li>Grab another advanced <code class="language-plaintext highlighter-rouge">join</code> block (which allows pasting several pieces of text together).</li>
  <li>In the first box, paste exactly this beginning of JSON code: <code class="language-plaintext highlighter-rouge">{"contents": [{"parts": [{"text": "</code></li>
  <li>In the second box, drag your <code class="language-plaintext highlighter-rouge">full_prompt</code> <code class="language-plaintext highlighter-rouge">app</code> variable.</li>
  <li>In the third box, close the JSON code with: <code class="language-plaintext highlighter-rouge">"}]}]}</code></li>
  <li>Assign the whole thing to the <code class="language-plaintext highlighter-rouge">set Web_API's Body to</code> block.</li>
</ol>

<p><img src="/content/images/thunkable_prompt_building.jpg" alt="Prompt building" style="display: block; margin: 0 auto;" /></p>

<p><strong>Extracting the JSON response:</strong></p>
<ul>
  <li>Trigger the call with the <code class="language-plaintext highlighter-rouge">call Gemini's Post</code> block.</li>
  <li>The API replies with a large block of complex textual data (<code class="language-plaintext highlighter-rouge">response</code>).</li>
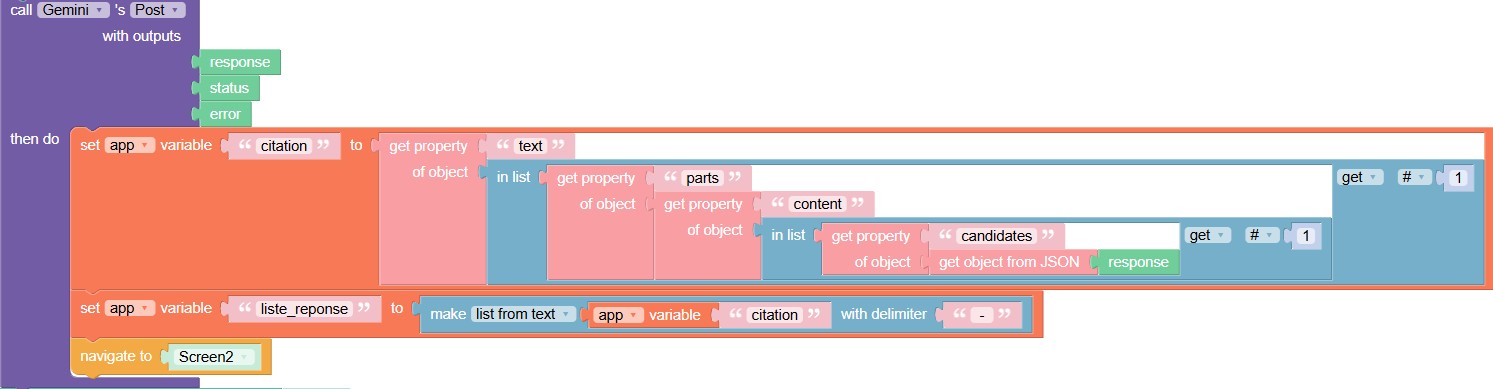
  <li>In the <code class="language-plaintext highlighter-rouge">then do</code> section, we will isolate the text we want by nesting several blocks, much like Russian dolls. We will assign this entire path to a new <code class="language-plaintext highlighter-rouge">citation</code> <code class="language-plaintext highlighter-rouge">app</code> variable.</li>
  <li>To fully understand this large red and blue block, read it from right to left (from the inside out):
    <ol>
      <li>We turn the raw text into a manageable object: <code class="language-plaintext highlighter-rouge">get object from JSON [response]</code>.</li>
      <li>We extract the <code class="language-plaintext highlighter-rouge">candidates</code> property.</li>
      <li>This is a list, so we grab the first item: <code class="language-plaintext highlighter-rouge">in list [...] get # 1</code>.</li>
      <li>We extract the <code class="language-plaintext highlighter-rouge">content</code> property.</li>
      <li>We extract the <code class="language-plaintext highlighter-rouge">parts</code> property.</li>
      <li>This is also a list, so we grab the first item: <code class="language-plaintext highlighter-rouge">in list [...] get # 1</code>.</li>
      <li>We finally extract the <code class="language-plaintext highlighter-rouge">text</code> property.</li>
    </ol>
  </li>
  <li><strong>Separating the quote from the author:</strong>
    <ol>
      <li>Create an <code class="language-plaintext highlighter-rouge">app liste_reponse</code> <code class="language-plaintext highlighter-rouge">app</code> variable.</li>
      <li>Assign to it the <code class="language-plaintext highlighter-rouge">make list from text</code> block (in <em>Lists</em>), using our <code class="language-plaintext highlighter-rouge">citation</code> <code class="language-plaintext highlighter-rouge">app</code> variable, and type <code class="language-plaintext highlighter-rouge">" - "</code> in the <code class="language-plaintext highlighter-rouge">delimiter</code> box.</li>
      <li>Now that our data is clean and split, finish by dragging the <code class="language-plaintext highlighter-rouge">Maps to Screen2</code> block.</li>
    </ol>
  </li>
</ul>

<p><img src="/content/images/thunkable_gemini_json_extract.jpg" alt="Web API Call and JSON parsing" style="display: block; margin: 0 auto;" /><br /></p>

<h2 id="on-screen2">On Screen2</h2>
<ol>
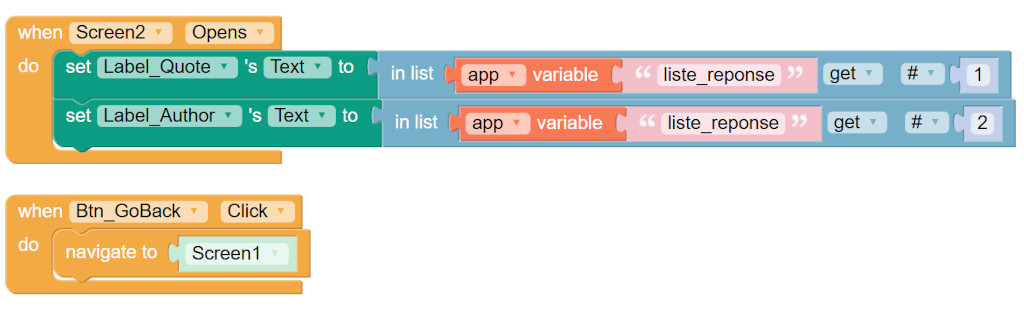
  <li>Update <code class="language-plaintext highlighter-rouge">Label_Quote</code> by getting the first item of this list (<code class="language-plaintext highlighter-rouge">in list get # 1</code> block).</li>
  <li>Update <code class="language-plaintext highlighter-rouge">Label_Author</code> by getting the second item (<code class="language-plaintext highlighter-rouge">in list get # 2</code> block).</li>
</ol>

<p><img src="/content/images/thunkable_gemini_blocks_part2.jpg" alt="Display the quote" style="display: block; margin: 0 auto;" /><br /></p>

<h1 id="step-5-try-it-out">Step 5: Try it out!</h1>
<p>The moment of truth has arrived.</p>
<ul>
  <li>Launch the app via <strong>Thunkable Live</strong> on your phone (or via the web preview).</li>
  <li>On the first screen, type a theme you care about in the text input (for example: “Stress management”, “Pushing your limits”, or “Learning to play guitar”).</li>
  <li>Tap <strong>Inspire me!</strong>.</li>
  <li>After a brief second (the time it takes for Google’s model to generate its response), you will automatically switch to the second screen.</li>
  <li>And there you have it! A unique, perfectly formatted quote tailored to your theme appears right before your eyes. You can just click “Go Back” to try with a new idea!</li>
</ul>

<h1 id="conclusion">Conclusion</h1>

<p>Congratulations! You have just created a mobile app capable of generating endless content using artificial intelligence. The limits of <em>no-code</em> are being pushed every day, and now is the perfect time to experiment.</p>

<p>Feel free to modify the RISEN prompt to create a recipe generator, a poem creator, or even an interactive quiz. The floor is yours!</p>]]></content><author><name>Geoff RÉAU</name><email>contact@reau.ca</email></author><category term="Tutorials" /><category term="No-Code" /><category term="Artificial Intelligence" /><category term="Thunkable" /><category term="Gemini" /><category term="API" /><category term="Mobile Development" /><category term="Tutorial" /><category term="No-Code" /><category term="Prompt Engineering" /><summary type="html"><![CDATA[In the first part of this tutorial, we connected our mobile prototype to a Firebase database. This is a great practice, especially relevant if you plan to transition to coding with frameworks like React Native later on. However, this approach keeps us dependent on a pre-filled database. Today, we are shifting into high gear. After 20 years in the IT industry, I am still fascinated by how easily we can now integrate artificial intelligence into an app with just a few clicks. We are going to replace our static database with the Google Gemini API to generate 100% custom quotes on the fly!]]></summary><media:thumbnail xmlns:media="http://search.yahoo.com/mrss/" url="https://www.reau.ca/content/images/thunkable-gemini-tuto.jpg" /><media:content medium="image" url="https://www.reau.ca/content/images/thunkable-gemini-tuto.jpg" xmlns:media="http://search.yahoo.com/mrss/" /></entry><entry xml:lang="fr"><title type="html">Tuto Thunkable (2/2) : Rendre son application mobile intelligente avec l’API Gemini</title><link href="https://www.reau.ca/2026/03/18/thunkable-tuto-partie-2.html" rel="alternate" type="text/html" title="Tuto Thunkable (2/2) : Rendre son application mobile intelligente avec l’API Gemini" /><published>2026-03-18T10:00:00+00:00</published><updated>2026-03-18T10:00:00+00:00</updated><id>https://www.reau.ca/2026/03/18/thunkable-tuto-partie-2</id><content type="html" xml:base="https://www.reau.ca/2026/03/18/thunkable-tuto-partie-2.html"><![CDATA[<p><img src="/content/images/thunkable-tuto-part2.jpg" alt="Tuto Thunkable - Intégrer Gemini API" style="display: block; margin: 0 auto;" /></p>

<p>Dans <strong><a href="/2026/03/13/thunkable-tuto-part-1.html">la première partie de ce tutoriel</a></strong>, nous avons connecté notre prototype mobile à une base de données Firebase. C’est une excellente pratique, particulièrement pertinente si vous envisagez de basculer plus tard sur du développement avec des frameworks comme React Native. Cependant, cette approche nous rend dépendants d’une base de données pré-remplie.</p>

<p>Aujourd’hui, on passe à la vitesse supérieure. Après 20 ans dans l’industrie des TI, je suis toujours fasciné par la façon dont on peut désormais intégrer de l’intelligence artificielle dans une application en quelques clics. Nous allons remplacer notre base statique par l’API de Google Gemini pour générer des citations 100% sur mesure, à la volée !
<!--more--></p>

<hr />
<p><strong><em>Avant-propos</em></strong>: <em>Cet article, augmenté d’améliorations générées avec des IA (<a href="https://gemini.google.com/">Google Gemini</a>), est mis à disposition au travers de la license</em> <span xmlns:cc="http://creativecommons.org/ns#"><i><a href="https://creativecommons.org/licenses/by-nd/4.0/?ref=chooser-v1" target="_blank" rel="license noopener noreferrer" style="display:inline-block;">CC BY-ND 4.0<img style="height:22px!important;margin-left:3px;vertical-align:text-bottom;" src="https://mirrors.creativecommons.org/presskit/icons/cc.svg?ref=chooser-v1" alt="" /><img style="height:22px!important;margin-left:3px;vertical-align:text-bottom;" src="https://mirrors.creativecommons.org/presskit/icons/by.svg?ref=chooser-v1" alt="" /><img style="height:22px!important;margin-left:3px;vertical-align:text-bottom;" src="https://mirrors.creativecommons.org/presskit/icons/nd.svg?ref=chooser-v1" alt="" /></a></i></span></p>

<hr />

<h1 id="étape-1--obtenir-les-clés-du-cerveau-google-ai-studio">Étape 1 : Obtenir les clés du cerveau (Google AI Studio)</h1>
<p>Pour parler à Gemini depuis notre application, il nous faut un laissez-passer : une clé d’API.</p>
<ul>
  <li>Rendez-vous sur <a href="https://aistudio.google.com/">Google AI Studio</a>.</li>
  <li>Connectez-vous avec votre compte Google.</li>
  <li>Dans le menu de gauche, cliquez sur <strong>Get API key</strong> puis sur le bouton <strong>Create API key</strong>.</li>
</ul>

<p><img src="/content/images/gemini_api_keygen.jpg" alt="Générer une clé API sur Google AI Studio" style="display: block; margin: 0 auto;" /><br /></p>

<ul>
  <li>Une fois la clé d’API créée, cliquez dessus pour l’afficher.</li>
  <li>Copiez cette longue suite de caractères et gardez-la précieusement (ne la partagez jamais publiquement).
<img src="/content/images/gemini_api_key.jpg" alt="Afficher une clé API sur Google AI Studio" style="display: block; margin: 0 auto;" /><br /></li>
</ul>

<h1 id="étape-2--adapter-le-design-de-motivapp">Étape 2 : Adapter le Design de MotivApp</h1>
<p>Reprenons notre projet Thunkable là où nous l’avons laissé. Nous allons ajouter un peu d’interactivité.</p>
<ul>
  <li><strong>Sur le Screen1 (Accueil) :</strong> Ajoutez un composant <strong>Text Input</strong> juste au-dessus du bouton “Inspire-moi !”. Modifiez son paramètre <em>Hint</em> (indice) pour afficher : “Entrez un thème (ex: Le sport, Le code…)”. Renommez ce composant <code class="language-plaintext highlighter-rouge">Input_Theme</code>.
<img src="/content/images/thunkable_gemini_design.jpg" alt="Design mis à jour avec le champ texte" style="display: block; margin: 0 auto;" /><br /></li>
</ul>

<h1 id="étape-3--le-prompt-engineering-avec-risen">Étape 3 : Le Prompt Engineering avec RISEN</h1>
<p>C’est le cœur du réacteur. Pour éviter que l’IA ne divague, nous allons structurer notre requête (prompt) avec le framework professionnel <strong>RISEN</strong>. Voici comment nous allons contraindre le modèle <code class="language-plaintext highlighter-rouge">gemini-2.5-flash</code> :</p>
<ul>
  <li><strong>R (Role) :</strong> Agis comme un coach de vie expert en motivation.</li>
  <li><strong>I (Instruction) :</strong> Écris une citation motivante inédite basée sur le thème suivant : [Thème tapé par l’utilisateur].</li>
  <li><strong>S (Steps) :</strong> 1. Analyse le thème. 2. Trouve un angle inspirant. 3. Formule la citation. 4. Attribue-la à un auteur fictif ou réel.</li>
  <li><strong>E (End Goal) :</strong> Le lecteur doit ressentir une envie immédiate de passer à l’action.</li>
  <li><strong>N (Narrowing) :</strong> La réponse DOIT suivre ce format strict : ‘Citation - Auteur’. Ne dépasse pas 20 mots. N’inclus aucune salutation.</li>
</ul>

<p>Voici exactement le texte final que notre application va assembler, en remplaçant la <code class="language-plaintext highlighter-rouge">app</code> variable de fin par le thème choisi par l’utilisateur :</p>

<figure class="highlight"><pre><code class="language-text" data-lang="text">Agis comme un coach de vie expert en motivation. 
Écris une citation motivante inédite basée sur le thème suivant : [THÈME DE L'UTILISATEUR]. 
1. Analyse le thème. 2. Trouve un angle inspirant. 3. Formule la citation. 4. Attribue-la à un auteur fictif ou réel. 
Le lecteur doit ressentir une envie immédiate de passer à l'action. 
La réponse DOIT suivre ce format strict : 'Citation - Auteur'. Ne dépasse pas 20 mots. N'inclus aucune salutation.</code></pre></figure>

<h1 id="étape-4--la-logique-et-les-blocs">Étape 4 : La Logique et les Blocs</h1>

<h2 id="sur-le-screen1">Sur le Screen1</h2>
<h3 id="aperçu-des-blocs">Aperçu des blocs</h3>
<p><img src="/content/images/thunkable_gemini_blocks_part1.jpg" alt="Aperçu des blocs du Screen1" style="display: block; margin: 0 auto;" /><br /></p>

<h3 id="séquence-des-blocs">Séquence des blocs</h3>

<p><strong>Initialisation</strong></p>
<ul>
  <li>À l’ouverture du <code class="language-plaintext highlighter-rouge">Screen1</code>, videz le champ <code class="language-plaintext highlighter-rouge">Input_Theme</code>.</li>
  <li>Lors du clic sur <code class="language-plaintext highlighter-rouge">Btn_Inspire</code>, nous devons vérifier que le texte <code class="language-plaintext highlighter-rouge">Text</code> du composant <code class="language-plaintext highlighter-rouge">Input_Theme</code> n’est pas vide avant d’exécuter les étapes suivantes.</li>
</ul>

<p><strong>Construire la requête API :</strong></p>
<ul>
  <li>
    <p>Créez un composant <strong>Web API</strong> : dans la liste de gauche, déroulez “Advanced”, puis cliquez sur le [+] à droite de “Web APIs”. C’est lui qui remplacera Firebase pour dialoguer avec les serveurs de Google.</p>

    <ul>
      <li>Renommez-le en <code class="language-plaintext highlighter-rouge">Gemini</code>.</li>
      <li>Configurez l’URL de l’API : définissez le champ “URL” à <code class="language-plaintext highlighter-rouge">https://generativelanguage.googleapis.com/v1beta/models/gemini-2.5-flash:generateContent</code>.</li>
      <li>Configurez votre clé d’API :
        <ul>
          <li>Définissez le champ “Property” à <code class="language-plaintext highlighter-rouge">key</code>.</li>
          <li>Collez votre clé d’API dans le champ “Value”.</li>
          <li>Cliquez sur [Add].</li>
        </ul>
      </li>
      <li>Configurez l’en-tête (header) :
        <ul>
          <li>Définissez le champ “Property” à <code class="language-plaintext highlighter-rouge">Content-Type</code>.</li>
          <li>Tapez <code class="language-plaintext highlighter-rouge">application/json</code> dans le champ “Value”.</li>
          <li>Cliquez sur [Add].</li>
        </ul>
      </li>
      <li>Cliquez sur [Done].</li>
    </ul>
  </li>
</ul>

<p><img src="/content/images/thunkable_webapi_config.jpg" alt="Configuration de la WebAPI" style="display: block; margin: 0 auto;" /><br /></p>

<p>L’API de Gemini est très stricte sur le format des données qu’elle reçoit. Elle attend un objet JSON contenant une liste <code class="language-plaintext highlighter-rouge">contents</code>, qui contient elle-même une liste <code class="language-plaintext highlighter-rouge">parts</code>, qui contient enfin l’attribut <code class="language-plaintext highlighter-rouge">text</code> avec notre prompt. Dans Thunkable, la façon la plus simple de construire ce corps de requête (le <em>Body</em>) est d’utiliser un bloc de texte.</p>

<ol>
  <li>D’abord, créez une <code class="language-plaintext highlighter-rouge">app</code> variable <code class="language-plaintext highlighter-rouge">full_prompt</code> et utilisez un bloc <code class="language-plaintext highlighter-rouge">join</code> pour y coller le gros bloc de texte RISEN (vu à l’étape 3) avec le texte <code class="language-plaintext highlighter-rouge">Text</code> du composant <code class="language-plaintext highlighter-rouge">Input_Theme</code>.</li>
  <li>Prenez un autre bloc de texte avancé <code class="language-plaintext highlighter-rouge">join</code> (qui permet de coller plusieurs morceaux de texte ensemble).</li>
  <li>Dans la première case, collez exactement ce début de code JSON : <code class="language-plaintext highlighter-rouge">{"contents": [{"parts": [{"text": "</code></li>
  <li>Dans la deuxième case, glissez votre <code class="language-plaintext highlighter-rouge">app</code> variable <code class="language-plaintext highlighter-rouge">full_prompt</code>.</li>
  <li>Dans la troisième case, fermez le code JSON avec : <code class="language-plaintext highlighter-rouge">"}]}]}</code></li>
  <li>Assignez le tout au bloc <code class="language-plaintext highlighter-rouge">set Web_API's Body to</code>.</li>
</ol>

<p><img src="/content/images/thunkable_prompt_building.jpg" alt="Construction du prompt" style="display: block; margin: 0 auto;" /></p>

<p><strong>Extraire la réponse JSON :</strong></p>
<ul>
  <li>Lancez l’appel avec le bloc <code class="language-plaintext highlighter-rouge">call Gemini's Post</code>.</li>
  <li>L’API nous répond avec un gros bloc de données textuelles complexes (<code class="language-plaintext highlighter-rouge">response</code>).</li>
  <li>Dans la section <code class="language-plaintext highlighter-rouge">then do</code>, nous allons isoler le texte qui nous intéresse en imbriquant plusieurs blocs, un peu comme des poupées russes. Nous allons assigner tout ce cheminement à une nouvelle <code class="language-plaintext highlighter-rouge">app</code> variable <code class="language-plaintext highlighter-rouge">citation</code>.</li>
  <li>Pour bien comprendre ce grand bloc rouge et bleu, lisez-le de droite à gauche (de l’intérieur vers l’extérieur) :
    <ol>
      <li>On transforme le texte brut en objet manipulable : <code class="language-plaintext highlighter-rouge">get object from JSON [response]</code>.</li>
      <li>On extrait la propriété <code class="language-plaintext highlighter-rouge">candidates</code>.</li>
      <li>C’est une liste, on prend le premier élément : <code class="language-plaintext highlighter-rouge">in list [...] get # 1</code>.</li>
      <li>On extrait la propriété <code class="language-plaintext highlighter-rouge">content</code>.</li>
      <li>On extrait la propriété <code class="language-plaintext highlighter-rouge">parts</code>.</li>
      <li>C’est aussi une liste, on prend le premier élément : <code class="language-plaintext highlighter-rouge">in list [...] get # 1</code>.</li>
      <li>On extrait enfin la propriété <code class="language-plaintext highlighter-rouge">text</code>.</li>
    </ol>
  </li>
  <li><strong>Séparer la citation de l’auteur :</strong> 1. Créez une <code class="language-plaintext highlighter-rouge">app</code> variable <code class="language-plaintext highlighter-rouge">liste_reponse</code>.
    <ol>
      <li>Assignez-lui le bloc <code class="language-plaintext highlighter-rouge">make list from text</code> (dans <em>Lists</em>), en utilisant notre <code class="language-plaintext highlighter-rouge">app</code> variable <code class="language-plaintext highlighter-rouge">citation</code>, et tapez <code class="language-plaintext highlighter-rouge">" - "</code> dans la case <code class="language-plaintext highlighter-rouge">delimiter</code>.</li>
      <li>Maintenant que nos données sont propres et découpées, terminez en glissant le bloc <code class="language-plaintext highlighter-rouge">Navigate to Screen2</code>.</li>
    </ol>
  </li>
</ul>

<p><img src="/content/images/thunkable_gemini_json_extract.jpg" alt="Appel Web API et parsing JSON" style="display: block; margin: 0 auto;" /><br /></p>

<h2 id="sur-le-screen2">Sur le Screen2</h2>
<ol>
  <li>Mettez à jour le <code class="language-plaintext highlighter-rouge">Label_Quote</code> en allant chercher le premier élément de cette liste (bloc <code class="language-plaintext highlighter-rouge">in list get # 1</code>).</li>
  <li>Mettez à jour le <code class="language-plaintext highlighter-rouge">Label_Author</code> en allant chercher le deuxième élément (bloc <code class="language-plaintext highlighter-rouge">in list get # 2</code>).</li>
</ol>

<p><img src="/content/images/thunkable_gemini_blocks_part2.jpg" alt="Affichage de la citation" style="display: block; margin: 0 auto;" /><br /></p>

<h1 id="étape-5--essayez-">Étape 5 : Essayez !</h1>
<p>Le moment de vérité est arrivé.</p>
<ul>
  <li>Lancez l’application via <strong>Thunkable Live</strong> sur votre téléphone (ou via l’aperçu Web de la plateforme).</li>
  <li>Sur le premier écran, tapez un thème qui vous inspire dans le champ de texte (par exemple : “La gestion du stress”, “Le dépassement de soi” ou “L’apprentissage de la guitare”).</li>
  <li>Appuyez sur <strong>Inspire-moi !</strong>.</li>
  <li>Après une brève seconde (le temps que le modèle de Google génère sa réponse), vous basculez automatiquement sur le deuxième écran.</li>
  <li>Et voilà ! Une citation unique, parfaitement formatée et taillée sur mesure pour votre thème s’affiche sous vos yeux. Vous n’avez plus qu’à cliquer sur “Retour” pour tester avec une nouvelle idée !</li>
</ul>

<h1 id="conclusion">Conclusion</h1>

<p>Félicitations ! Vous venez de créer une application mobile capable de générer du contenu à l’infini grâce à l’intelligence artificielle. Les limites du <em>no-code</em> sont repoussées tous les jours, et c’est le moment idéal pour expérimenter.</p>

<p>N’hésitez pas à modifier le prompt RISEN pour créer un générateur de recettes de cuisine, un créateur de poèmes ou même un quiz interactif. À vous de jouer !</p>]]></content><author><name>Geoff RÉAU</name><email>contact@reau.ca</email></author><category term="Tutorials" /><category term="No-Code" /><category term="Artificial Intelligence" /><category term="Thunkable" /><category term="Gemini" /><category term="API" /><category term="Développement Mobile" /><category term="Tutoriel" /><category term="No-Code" /><category term="Prompt Engineering" /><summary type="html"><![CDATA[Dans la première partie de ce tutoriel, nous avons connecté notre prototype mobile à une base de données Firebase. C’est une excellente pratique, particulièrement pertinente si vous envisagez de basculer plus tard sur du développement avec des frameworks comme React Native. Cependant, cette approche nous rend dépendants d’une base de données pré-remplie. Aujourd’hui, on passe à la vitesse supérieure. Après 20 ans dans l’industrie des TI, je suis toujours fasciné par la façon dont on peut désormais intégrer de l’intelligence artificielle dans une application en quelques clics. Nous allons remplacer notre base statique par l’API de Google Gemini pour générer des citations 100% sur mesure, à la volée !]]></summary><media:thumbnail xmlns:media="http://search.yahoo.com/mrss/" url="https://www.reau.ca/content/images/thunkable-gemini-tuto.jpg" /><media:content medium="image" url="https://www.reau.ca/content/images/thunkable-gemini-tuto.jpg" xmlns:media="http://search.yahoo.com/mrss/" /></entry><entry xml:lang="en"><title type="html">Thunkable Tuto (1/2): Create a Cloud-connected mobile app with Firebase, no-code</title><link href="https://www.reau.ca/2026/03/13/thunkable-tuto-part-1.html" rel="alternate" type="text/html" title="Thunkable Tuto (1/2): Create a Cloud-connected mobile app with Firebase, no-code" /><published>2026-03-13T10:00:00+00:00</published><updated>2026-03-13T10:00:00+00:00</updated><id>https://www.reau.ca/2026/03/13/thunkable-tuto-part-1</id><content type="html" xml:base="https://www.reau.ca/2026/03/13/thunkable-tuto-part-1.html"><![CDATA[<p><img src="/content/images/thunkable-tuto-part1.jpg" alt="Thunkable Tuto - Cloud-connected mobile app with Firebase" style="display: block; margin: 0 auto;" /></p>

<p>Starting this year, I have the opportunity to act as a mentor for the Technovation Montreal program. Seeing teams go from a simple idea to a functional mobile prototype in just a few weeks reminded me of one key thing: <em>no-code</em> is an absolutely fantastic driver of innovation.</p>

<p>Even when you aim to develop mobile apps from scratch using advanced frameworks like React Native, leveraging these visual platforms allows you to validate a backend architecture and an interface logic in a flash 🙂</p>

<p>To put my money where my mouth is, I’m proposing a new two-part tutorial series to build a dynamic, Cloud-connected iOS/Android mobile app, without writing a single line of traditional code.
<!--more--></p>

<hr />
<p><strong><em>Foreword</em></strong>: <em>This article, enhanced with improvements generated by AI (<a href="https://gemini.google.com/">Google Gemini</a>), is made available under the</em> <span xmlns:cc="http://creativecommons.org/ns#"><i><a href="https://creativecommons.org/licenses/by-nd/4.0/?ref=chooser-v1" target="_blank" rel="license noopener noreferrer" style="display:inline-block;">CC BY-ND 4.0<img style="height:22px!important;margin-left:3px;vertical-align:text-bottom;" src="https://mirrors.creativecommons.org/presskit/icons/cc.svg?ref=chooser-v1" alt="" /><img style="height:22px!important;margin-left:3px;vertical-align:text-bottom;" src="https://mirrors.creativecommons.org/presskit/icons/by.svg?ref=chooser-v1" alt="" /><img style="height:22px!important;margin-left:3px;vertical-align:text-bottom;" src="https://mirrors.creativecommons.org/presskit/icons/nd.svg?ref=chooser-v1" alt="" /></a></i></span></p>

<hr />

<h1 id="whats-the-game-plan">What’s the game plan?</h1>
<p>The goal of this mini-series is to build a mobile app by progressively integrating professional concepts. Here is our roadmap:</p>
<ol>
  <li><strong>Today:</strong> Create the interface for a “Motivational Quotes” app (MotivApp) using <a href="https://thunkable.com/">Thunkable</a>, and connect it to a real, real-time Cloud database with <a href="https://firebase.google.com/">Firebase</a>.</li>
  <li><strong>Part 2:</strong> Make the app smart by replacing our database with calls to the Google Gemini API to generate unique quotes on the fly 🚀</li>
</ol>

<h1 id="15-minutes-flat-to-prototype-our-app">15 minutes flat to prototype our app!</h1>

<p>Our application will feature two screens: a home screen with an “Inspire me!” button, and a display screen that will randomly pull a quote stored in the Cloud.</p>

<h2 id="step-1-prepare-the-backend-with-firebase">Step 1: Prepare the backend with Firebase</h2>
<p>Firebase is Google’s platform that provides ready-to-use backend services. We are going to use its <strong>Realtime Database</strong>.</p>

<ol>
  <li>Log into the <a href="https://console.firebase.google.com/">Firebase Console</a> with a Google account and click on <strong>Create a project</strong> (name it <em>MotivApp</em>).</li>
  <li>In the left menu, go to <strong>Databases &amp; Storage</strong> &gt; <strong>Realtime Database</strong> and click on <strong>Create database</strong>. Choose the test mode to start easily.</li>
  <li>In the <strong>Data</strong> tab, we will structure our database with unique identifiers to make it robust. Click on the three little dots to the right of your database URL, choose <strong>Import JSON</strong>, and import a file containing this:</li>
</ol>

<figure class="highlight"><pre><code class="language-json" data-lang="json"><span class="p">{</span><span class="w">
  </span><span class="nl">"quotes"</span><span class="p">:</span><span class="w"> </span><span class="p">{</span><span class="w">
    </span><span class="nl">"quote_001"</span><span class="p">:</span><span class="w"> </span><span class="p">{</span><span class="w">
      </span><span class="nl">"text"</span><span class="p">:</span><span class="w"> </span><span class="s2">"Success is falling nine times and getting up ten."</span><span class="p">,</span><span class="w">
      </span><span class="nl">"author"</span><span class="p">:</span><span class="w"> </span><span class="s2">"Japanese Proverb"</span><span class="w">
    </span><span class="p">},</span><span class="w">
    </span><span class="nl">"quote_002"</span><span class="p">:</span><span class="w"> </span><span class="p">{</span><span class="w">
      </span><span class="nl">"text"</span><span class="p">:</span><span class="w"> </span><span class="s2">"Make your life a dream, and a dream a reality."</span><span class="p">,</span><span class="w">
      </span><span class="nl">"author"</span><span class="p">:</span><span class="w"> </span><span class="s2">"Antoine de Saint-Exupéry"</span><span class="w">
    </span><span class="p">},</span><span class="w">
    </span><span class="nl">"quote_003"</span><span class="p">:</span><span class="w"> </span><span class="p">{</span><span class="w">
      </span><span class="nl">"text"</span><span class="p">:</span><span class="w"> </span><span class="s2">"Innovation distinguishes between a leader and a follower."</span><span class="p">,</span><span class="w">
      </span><span class="nl">"author"</span><span class="p">:</span><span class="w"> </span><span class="s2">"Steve Jobs"</span><span class="w">
    </span><span class="p">}</span><span class="w">
  </span><span class="p">}</span><span class="w">
</span><span class="p">}</span></code></pre></figure>

<p><img src="/content/images/firebase_rtdb_setup_en.jpg" alt="JSON structure in Firebase" style="display: block; margin: 0 auto;" /><br /></p>

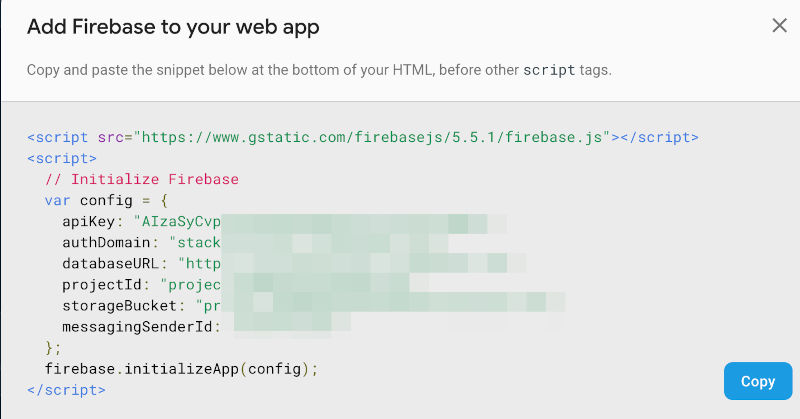
<p><em>Keep your database URL and your Web API key (available in the Firebase project settings) handy, we’ll need them in Thunkable!</em></p>

<p>The easiest way to find your API key is to:</p>

<ol>
  <li>Go to the Project overview page in the Firebase console.</li>
  <li>Click on the button [+ Add app]</li>
  <li>Click on the button &lt;/&gt; to add a Web app.</li>
  <li>Put <em>MotivApp</em> as app nickname, then click on [Register app].</li>
  <li>You’ll get a pop up with the values you need.</li>
</ol>

<p><img src="/content/images/firebase_api_key.jpg" alt="Diplaying API key in Firebase console" style="display: block; margin: 0 auto;" /><br /></p>

<h2 id="step-2-the-design-visual-interface">Step 2: The Design (Visual Interface)</h2>

<p>Create a free account on <a href="https://x.thunkable.com/signup">Thunkable</a> and start a new project :</p>
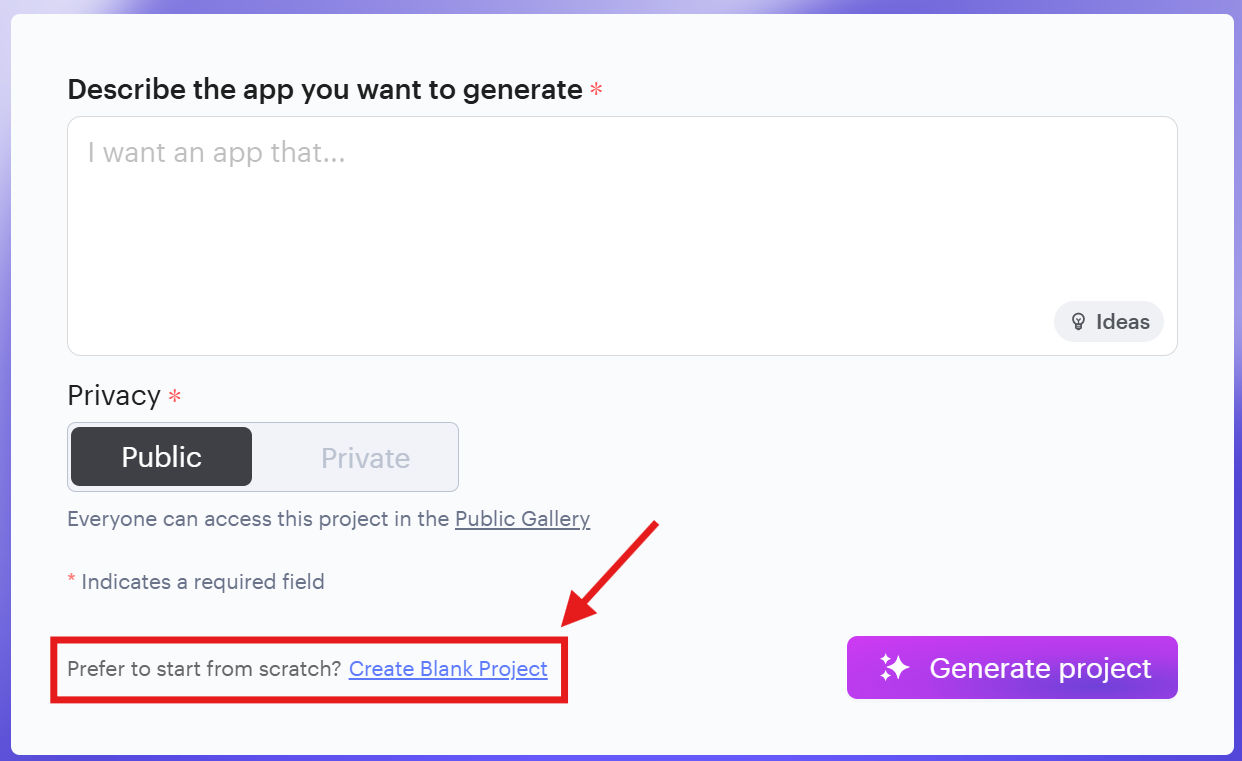
<ul>
  <li>On the main screen, you’ll have a prompt box.</li>
  <li>At the bottom of that prompt box, find the line “Prefer to start from scratch?” then click on <u>Create Blank Project</u>”.</li>
</ul>

<p><img src="/content/images/thunkable_pbox.jpg" alt="Thunkable Prompt Box" style="display: block; margin: 0 auto;" /><br /></p>

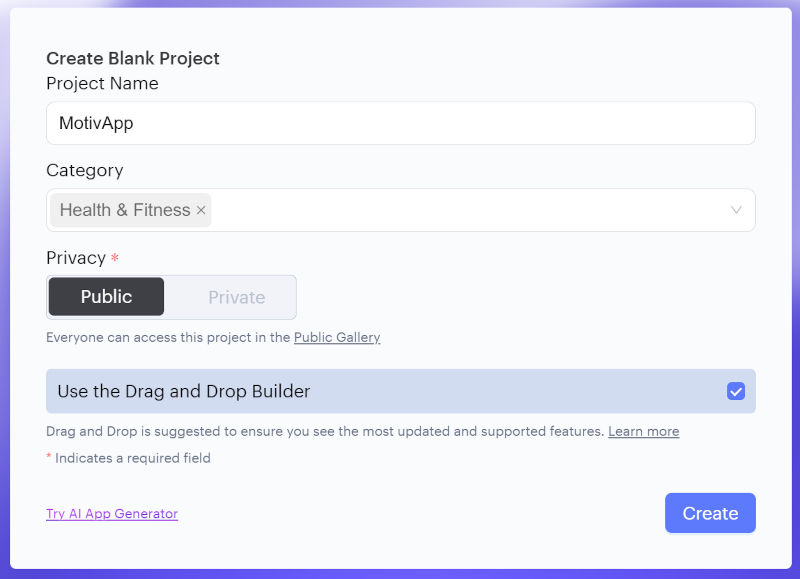
<ul>
  <li>Put <em>MotivApp</em> as Project name, select <em>Health &amp; Fitness</em>, make sure that <em>Use the Drag and Drop Builder</em> is selected.</li>
  <li>Click on [Create].</li>
</ul>

<p><img src="/content/images/thunkable_app_def.jpg" alt="Thunkable App definition" style="display: block; margin: 0 auto;" /><br /></p>

<p><strong>On Screen1 (Home):</strong></p>
<ol>
  <li>Drag a <strong>Label</strong> component to the center of the screen with the text “Welcome to MotivApp!”. Center text and change font zsize using the options in the left tree view.</li>
  <li>Drag a <strong>Button</strong> component below it. Change its text to “Inspire me!”. Rename this component to <code class="language-plaintext highlighter-rouge">Btn_Inspire</code> in the left tree view.</li>
</ol>

<p><img src="/content/images/thunkable_screen_1.jpg" alt="Screen 1 of the MotivApp application" style="display: block; margin: 0 auto;" /><br /></p>

<p><strong>On Screen2 (Quote):</strong></p>
<ol>
  <li>Add a second screen (<code class="language-plaintext highlighter-rouge">Screen2</code>).</li>
  <li>Drag two <strong>Labels</strong> one below the other. The first one (main text) will be renamed <code class="language-plaintext highlighter-rouge">Label_Quote</code>, the second one (smaller, for the author) will be <code class="language-plaintext highlighter-rouge">Label_Author</code>.</li>
  <li>Drag a <strong>Button</strong> below with the text “Go Back” (<code class="language-plaintext highlighter-rouge">Btn_GoBack</code>).</li>
  <li><strong>Connect your Realtime Database</strong>
    <ul>
      <li>In your Thunkable tab, click the Settings gear icon in the sidebar.</li>
      <li>Scroll to the Firebase section and paste the “apiKey” into the “Firebase API Key” field.</li>
      <li>Still in the Firebase section, paste the “databaseURL” into the “Database URL” field.</li>
    </ul>
  </li>
</ol>

<p><img src="/content/images/thunkable_screen_2.jpg" alt="Screen 1 of the MotivApp application" style="display: block; margin: 0 auto;" /><br /></p>

<h2 id="step-3-the-logic-blocks">Step 3: The Logic (Blocks)</h2>
<p>Switch from the <strong>Design</strong> tab to the <strong>Blocks</strong> tab. This is where the magic happens!</p>

<p><strong>Screen1 Logic:</strong></p>
<ul>
  <li>Grab the <code class="language-plaintext highlighter-rouge">when Btn_Inspire Clicks do</code> block and drag the <code class="language-plaintext highlighter-rouge">Navigate to Screen2</code> block inside it.</li>
</ul>

<p><strong>Screen2 Logic (Extracting JSON data):</strong>
Here, we need to retrieve our dictionary of quotes, pick one at random, and then isolate its text and author.</p>

<ol>
  <li>Go to <em>Variables</em> and grab the <code class="language-plaintext highlighter-rouge">initialize cloud variable name</code> block. Name it <code class="language-plaintext highlighter-rouge">"quotes"</code> (this must <em>exactly</em> match the root node name of our JSON in Firebase so Thunkable syncs it automatically).</li>
  <li>Grab the <code class="language-plaintext highlighter-rouge">when Screen2 Opens do</code> block.</li>
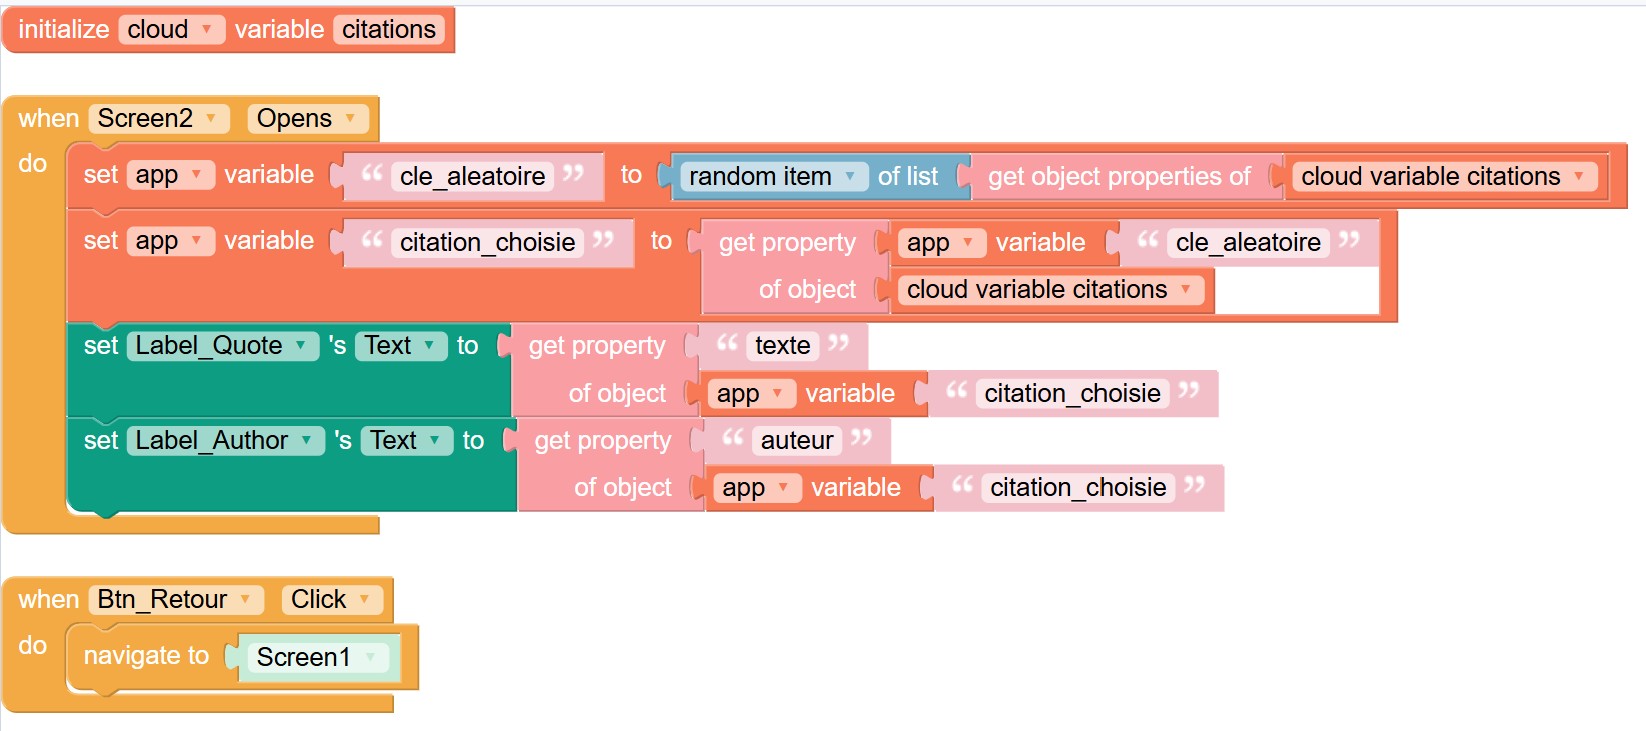
  <li>Inside, we’ll first list our keys. Create a temporary variable <code class="language-plaintext highlighter-rouge">random_key</code>. Assign to it the <code class="language-plaintext highlighter-rouge">random item of list</code> block. The list to provide will be generated by the <code class="language-plaintext highlighter-rouge">get object properties of</code> block (in the <em>Objects</em> category) applied to our <code class="language-plaintext highlighter-rouge">quotes</code> cloud variable.</li>
  <li>Now that we have a random key (e.g., <em>quote_002</em>), let’s create a <code class="language-plaintext highlighter-rouge">chosen_quote</code> variable. Assign to it the property (<code class="language-plaintext highlighter-rouge">get property of object</code> block) corresponding to <code class="language-plaintext highlighter-rouge">random_key</code> extracted from our <code class="language-plaintext highlighter-rouge">cloud quotes</code> object.</li>
  <li>Finally, update your labels! Assign the <code class="language-plaintext highlighter-rouge">"text"</code> property of the <code class="language-plaintext highlighter-rouge">chosen_quote</code> object to <code class="language-plaintext highlighter-rouge">Label_Quote</code>, and its <code class="language-plaintext highlighter-rouge">"author"</code> property to <code class="language-plaintext highlighter-rouge">Label_Author</code>.</li>
  <li>Grab the <code class="language-plaintext highlighter-rouge">when Btn_Inspire Clicks do</code> block and drag the <code class="language-plaintext highlighter-rouge">Navigate to Screen1</code> block inside it.</li>
</ol>

<p><img src="/content/images/thunkable_firebase_blocks_en.jpg" alt="Thunkable logic blocks with Firebase" style="display: block; margin: 0 auto;" /><br /></p>

<h2 id="step-4-test-the-beast">Step 4: Test the beast!</h2>
<p>No need to compile!</p>
<ul>
  <li>Download the <strong>Thunkable Live</strong> app on your smartphone (iOS or Android).</li>
  <li>Log in with your account. Tap your project and test: you should see a new quote pulled directly from your Cloud database with every try 😉</li>
</ul>

<hr />

<h2 id="conclusion">Conclusion</h2>

<p>And there you have it! You’ve created a real mobile app connected to a professional backend. The huge advantage of this architecture is that you can now add, edit, or delete quotes directly from the Firebase console, and your users’ app will update instantly, without them having to re-download it.</p>

<p>But why stop there? In <strong><a href="2026/03/18/thunkable-tuto-part-2.html">part 2 of this tutorial</a></strong>, we will replace our Firebase database with the Gemini artificial intelligence API. Our app will no longer just read quotes, it will invent them on demand! Stay tuned.</p>]]></content><author><name>Geoff RÉAU</name><email>contact@reau.ca</email></author><category term="Tutorials" /><category term="No-Code" /><category term="Thunkable" /><category term="Firebase" /><category term="Mobile Development" /><category term="Tutorial" /><category term="App" /><category term="No-Code" /><summary type="html"><![CDATA[Starting this year, I have the opportunity to act as a mentor for the Technovation Montreal program. Seeing teams go from a simple idea to a functional mobile prototype in just a few weeks reminded me of one key thing: no-code is an absolutely fantastic driver of innovation. Even when you aim to develop mobile apps from scratch using advanced frameworks like React Native, leveraging these visual platforms allows you to validate a backend architecture and an interface logic in a flash 🙂 To put my money where my mouth is, I’m proposing a new two-part tutorial series to build a dynamic, Cloud-connected iOS/Android mobile app, without writing a single line of traditional code.]]></summary><media:thumbnail xmlns:media="http://search.yahoo.com/mrss/" url="https://www.reau.ca/content/images/thunkable-tuto-part1.jpg" /><media:content medium="image" url="https://www.reau.ca/content/images/thunkable-tuto-part1.jpg" xmlns:media="http://search.yahoo.com/mrss/" /></entry><entry xml:lang="fr"><title type="html">Tuto Thunkable (1/2) : Créer une app mobile connectée au Cloud avec Firebase, sans coder</title><link href="https://www.reau.ca/2026/03/13/thunkable-tuto-partie-1.html" rel="alternate" type="text/html" title="Tuto Thunkable (1/2) : Créer une app mobile connectée au Cloud avec Firebase, sans coder" /><published>2026-03-13T10:00:00+00:00</published><updated>2026-03-13T10:00:00+00:00</updated><id>https://www.reau.ca/2026/03/13/thunkable-tuto-partie-1</id><content type="html" xml:base="https://www.reau.ca/2026/03/13/thunkable-tuto-partie-1.html"><![CDATA[<p><img src="/content/images/thunkable-tuto-part1.jpg" alt="Tuto Thunkable - App mobile connectée avec Firebase" style="display: block; margin: 0 auto;" /></p>

<p>Depuis cette année, j’ai l’occasion d’agir comme mentor pour le programme Technovation Montréal. Voir des équipes passer d’une simple idée à un prototype mobile fonctionnel en quelques semaines m’a rappelé une chose essentielle : le <em>no-code</em> est un levier d’innovation absolument fantastique.</p>

<p>Même lorsque l’on ambitionne de développer soi-même des applications mobiles de A à Z avec des frameworks avancés comme React Native, passer par ces plateformes visuelles permet de valider une architecture backend et une logique d’interface en un éclair 🙂</p>

<p>Pour joindre le geste à la parole, je vous propose une nouvelle série de deux tutoriels pour créer une application mobile iOS/Android dynamique et connectée au Cloud, sans écrire une seule ligne de code classique.
<!--more--></p>

<hr />
<p><strong><em>Avant-propos</em></strong>: <em>Cet article, augmenté d’améliorations générées avec des IA (<a href="https://gemini.google.com/">Google Gemini</a>), est mis à disposition au travers de la license</em> <span xmlns:cc="http://creativecommons.org/ns#"><i><a href="https://creativecommons.org/licenses/by-nd/4.0/?ref=chooser-v1" target="_blank" rel="license noopener noreferrer" style="display:inline-block;">CC BY-ND 4.0<img style="height:22px!important;margin-left:3px;vertical-align:text-bottom;" src="https://mirrors.creativecommons.org/presskit/icons/cc.svg?ref=chooser-v1" alt="" /><img style="height:22px!important;margin-left:3px;vertical-align:text-bottom;" src="https://mirrors.creativecommons.org/presskit/icons/by.svg?ref=chooser-v1" alt="" /><img style="height:22px!important;margin-left:3px;vertical-align:text-bottom;" src="https://mirrors.creativecommons.org/presskit/icons/nd.svg?ref=chooser-v1" alt="" /></a></i></span></p>

<hr />

<h1 id="cest-quoi-le-plan-de-match-">C’est quoi le plan de match ?</h1>
<p>L’objectif de cette mini-série est de construire une application mobile en y intégrant progressivement des concepts professionnels. Voici notre feuille de route :</p>
<ol>
  <li><strong>Aujourd’hui :</strong> Créer l’interface d’une application de “Citations Motivantes” (MotivApp) avec <a href="https://thunkable.com/">Thunkable</a>, et la connecter à une vraie base de données Cloud en temps réel avec <a href="https://firebase.google.com/">Firebase</a>.</li>
  <li><strong>Partie 2 :</strong> Rendre l’application intelligente en remplaçant notre base de données par des requêtes à l’API de Google Gemini pour générer des citations uniques à la volée 🚀</li>
</ol>

<h1 id="15-minutes-chrono-pour-prototyper-notre-application-">15 minutes chrono pour prototyper notre application !</h1>

<p>Notre application comportera deux écrans : un écran d’accueil avec un bouton “Inspire-moi !”, et un écran d’affichage qui ira piocher aléatoirement une citation stockée dans le Cloud.</p>

<h2 id="étape-1--préparer-le-backend-avec-firebase">Étape 1 : Préparer le backend avec Firebase</h2>
<p>Firebase est la plateforme de Google qui fournit des services backend prêts à l’emploi. Nous allons utiliser sa <strong>Realtime Database</strong>.</p>

<ol>
  <li>Connectez-vous à la <a href="https://console.firebase.google.com/">Console Firebase</a> avec un compte Google et cliquez sur <strong>Créer un projet</strong> (nommez-le <em>MotivApp</em>).</li>
  <li>Dans le menu de gauche, allez dans <strong>Bases de données et stockage d’objets</strong> &gt; <strong>Realtime Database</strong> et cliquez sur <strong>Créer une base de données</strong>. Sélectionner la région la plus proche de vous, puis choisissez le mode test pour commencer facilement.</li>
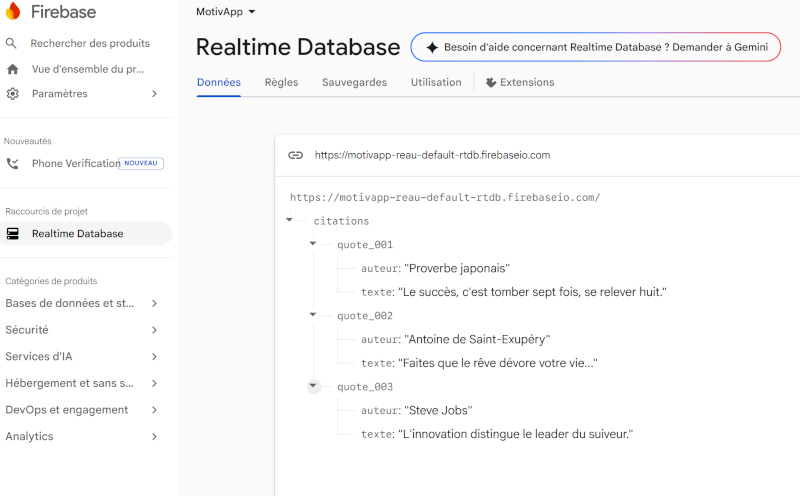
  <li>Dans l’onglet <strong>Données</strong>, nous allons structurer notre base avec des identifiants uniques pour que ce soit robuste. Cliquez sur les trois petits points à droite de l’URL de votre base, choisissez <strong>Importer un fichier JSON</strong>, et importez un fichier contenant ceci :</li>
</ol>

<figure class="highlight"><pre><code class="language-json" data-lang="json"><span class="p">{</span><span class="w">
  </span><span class="nl">"citations"</span><span class="p">:</span><span class="w"> </span><span class="p">{</span><span class="w">
    </span><span class="nl">"quote_001"</span><span class="p">:</span><span class="w"> </span><span class="p">{</span><span class="w">
      </span><span class="nl">"texte"</span><span class="p">:</span><span class="w"> </span><span class="s2">"Le succès, c'est tomber sept fois, se relever huit."</span><span class="p">,</span><span class="w">
      </span><span class="nl">"auteur"</span><span class="p">:</span><span class="w"> </span><span class="s2">"Proverbe japonais"</span><span class="w">
    </span><span class="p">},</span><span class="w">
    </span><span class="nl">"quote_002"</span><span class="p">:</span><span class="w"> </span><span class="p">{</span><span class="w">
      </span><span class="nl">"texte"</span><span class="p">:</span><span class="w"> </span><span class="s2">"Faites que le rêve dévore votre vie..."</span><span class="p">,</span><span class="w">
      </span><span class="nl">"auteur"</span><span class="p">:</span><span class="w"> </span><span class="s2">"Antoine de Saint-Exupéry"</span><span class="w">
    </span><span class="p">},</span><span class="w">
    </span><span class="nl">"quote_003"</span><span class="p">:</span><span class="w"> </span><span class="p">{</span><span class="w">
      </span><span class="nl">"texte"</span><span class="p">:</span><span class="w"> </span><span class="s2">"L'innovation distingue le leader du suiveur."</span><span class="p">,</span><span class="w">
      </span><span class="nl">"auteur"</span><span class="p">:</span><span class="w"> </span><span class="s2">"Steve Jobs"</span><span class="w">
    </span><span class="p">}</span><span class="w">
  </span><span class="p">}</span><span class="w">
</span><span class="p">}</span></code></pre></figure>

<p><img src="/content/images/firebase_rtdb_setup.jpg" alt="Structure JSON dans Firebase" style="display: block; margin: 0 auto;" /><br /></p>

<p><em>Gardez l’URL de votre base de données et votre clé d’API web sous la main, nous en aurons besoin dans Thunkable !</em></p>

<p>La manière la plus simple de trouver votre clé API et l’URL de votre base est de :</p>

<ol>
  <li>Se rendre sur la page Vue d’ensemble du projet dans la console Firebase.</li>
  <li>Cliquer sur le bouton [+ Ajouter une application]</li>
  <li>Cliquer sur le bouton &lt;/&gt; pour ajouter une application web.</li>
  <li>Mettez <em>MotivApp</em> en pseudo d’application, puis cliquer sur [Enregistrer l’application].</li>
  <li>Une fenêtre contextuelle s’affichera avec toutes les valeurs dont vous avez besoin.
<img src="/content/images/firebase_api_key.jpg" alt="Affichage de la clé API et de l'URL de la base de données dans la console Firebase" style="display: block; margin: 0 auto;" /><br /></li>
</ol>

<h2 id="étape-2--le-design-interface-visuelle">Étape 2 : Le Design (Interface Visuelle)</h2>

<p>Créez un compte gratuit sur <a href="https://x.thunkable.com/signup">Thunkable</a> et démarrez un nouveau projet:</p>
<ul>
  <li>Sur l’écran principal, vous trouverez une zone de saisie (prompt box).</li>
  <li>Au bas de cette zone, repérez la mention « Prefer to start from scratch? » puis cliquez sur <u>Create Blank Project</u>.</li>
</ul>

<p><img src="/content/images/thunkable_pbox.jpg" alt="Thunkable Prompt Box" style="display: block; margin: 0 auto;" /><br /></p>

<ul>
  <li>Saisissez <em>MotivApp</em> comme nom de projet (Project name), sélectionnez <em>Health &amp; Fitness</em>, et assurez-vous que l’option <em>Use the Drag and Drop Builder</em> est bien cochée.</li>
  <li>Cliquez sur [Create].</li>
</ul>

<p><img src="/content/images/thunkable_app_def.jpg" alt="Thunkable App definition" style="display: block; margin: 0 auto;" /><br /></p>

<p><strong>Sur le Screen1 (Accueil) :</strong></p>
<ol>
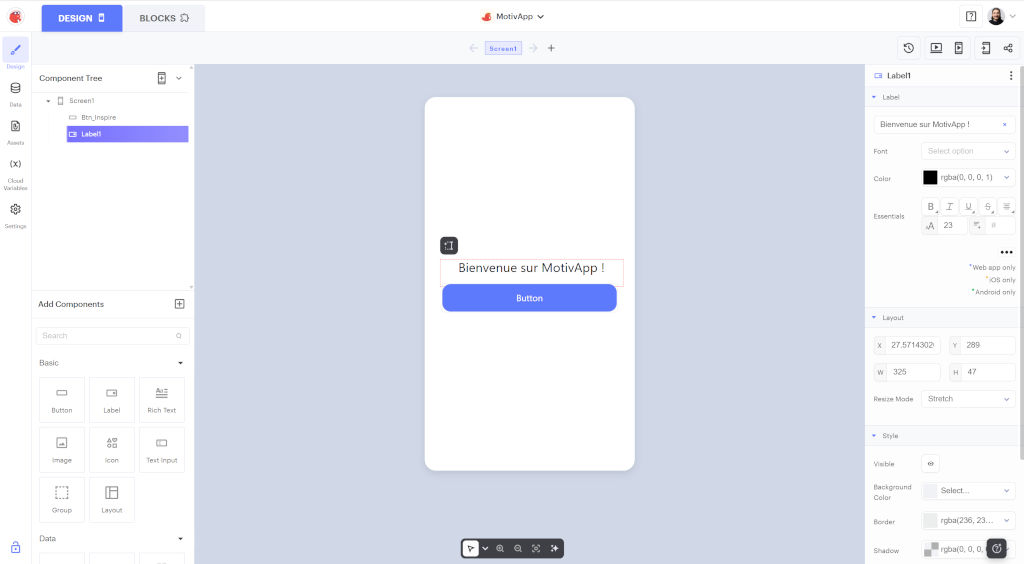
  <li>Glissez un composant <strong>Label</strong> au centre de l’écran avec le texte “Bienvenue sur MotivApp !”. Centrez le texte et changer la taille de police dans l’arborescence à gauche.</li>
  <li>Glissez un composant <strong>Button</strong> en dessous. Changez son texte pour “Inspire-moi !”. Renommez ce composant <code class="language-plaintext highlighter-rouge">Btn_Inspire</code> dans l’arborescence à gauche.</li>
</ol>

<p><img src="/content/images/thunkable_screen_1.jpg" alt="Écran 1 de l'application MotivApp" style="display: block; margin: 0 auto;" /><br /></p>

<p><strong>Sur le Screen2 (Citation) :</strong></p>
<ol>
  <li>Ajoutez un deuxième écran (<code class="language-plaintext highlighter-rouge">Screen2</code>).</li>
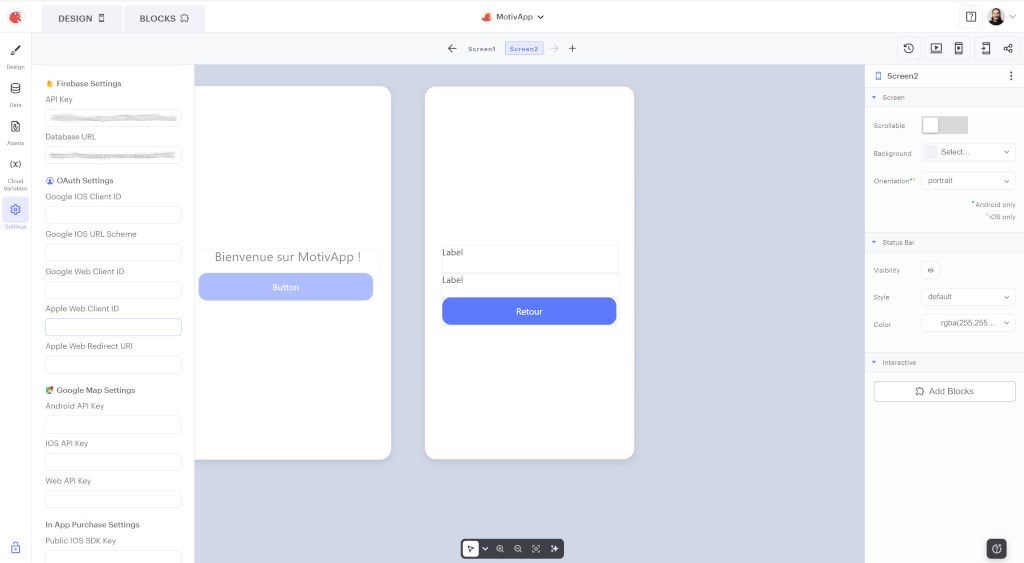
  <li>Glissez deux <strong>Labels</strong> l’un sous l’autre. Le premier (texte principal) sera renommé <code class="language-plaintext highlighter-rouge">Label_Quote</code>, le second (plus petit, pour l’auteur) sera <code class="language-plaintext highlighter-rouge">Label_Author</code>.</li>
  <li>Glissez un <strong>Button</strong> en dessous avec le texte “Retour” (<code class="language-plaintext highlighter-rouge">Btn_Retour</code>).</li>
  <li><strong>Connectez votre Realtime Database</strong>
    <ul>
      <li>Dans votre onglet Thunkable, cliquez sur l’icône d’engrenage (Settings) dans la barre latérale.</li>
      <li>Faites défiler jusqu’à la section Firebase et collez la valeur « apiKey » dans le champ « Firebase API Key ».</li>
      <li>Toujours dans la section Firebase, collez l’URL « databaseURL » dans le champ « Database URL ».</li>
    </ul>
  </li>
</ol>

<p><img src="/content/images/thunkable_screen_2.jpg" alt="Écran 2 de l'application MotivApp" style="display: block; margin: 0 auto;" /><br /></p>

<h2 id="étape-3--la-logique-les-blocs">Étape 3 : La Logique (Les Blocs)</h2>
<p>Passez de l’onglet <strong>Design</strong> à l’onglet <strong>Blocks</strong>. C’est ici que la magie opère !</p>

<p><strong>Logique du Screen1 :</strong></p>
<ul>
  <li>Prenez le bloc <code class="language-plaintext highlighter-rouge">when Btn_Inspire Clicks do</code> et glissez à l’intérieur le bloc <code class="language-plaintext highlighter-rouge">Navigate to Screen2</code>.</li>
</ul>

<p><strong>Logique du Screen2 (Extraction des données JSON) :</strong>
Ici, nous devons récupérer notre dictionnaire de citations, en choisir une au hasard, puis isoler son texte et son auteur.</p>

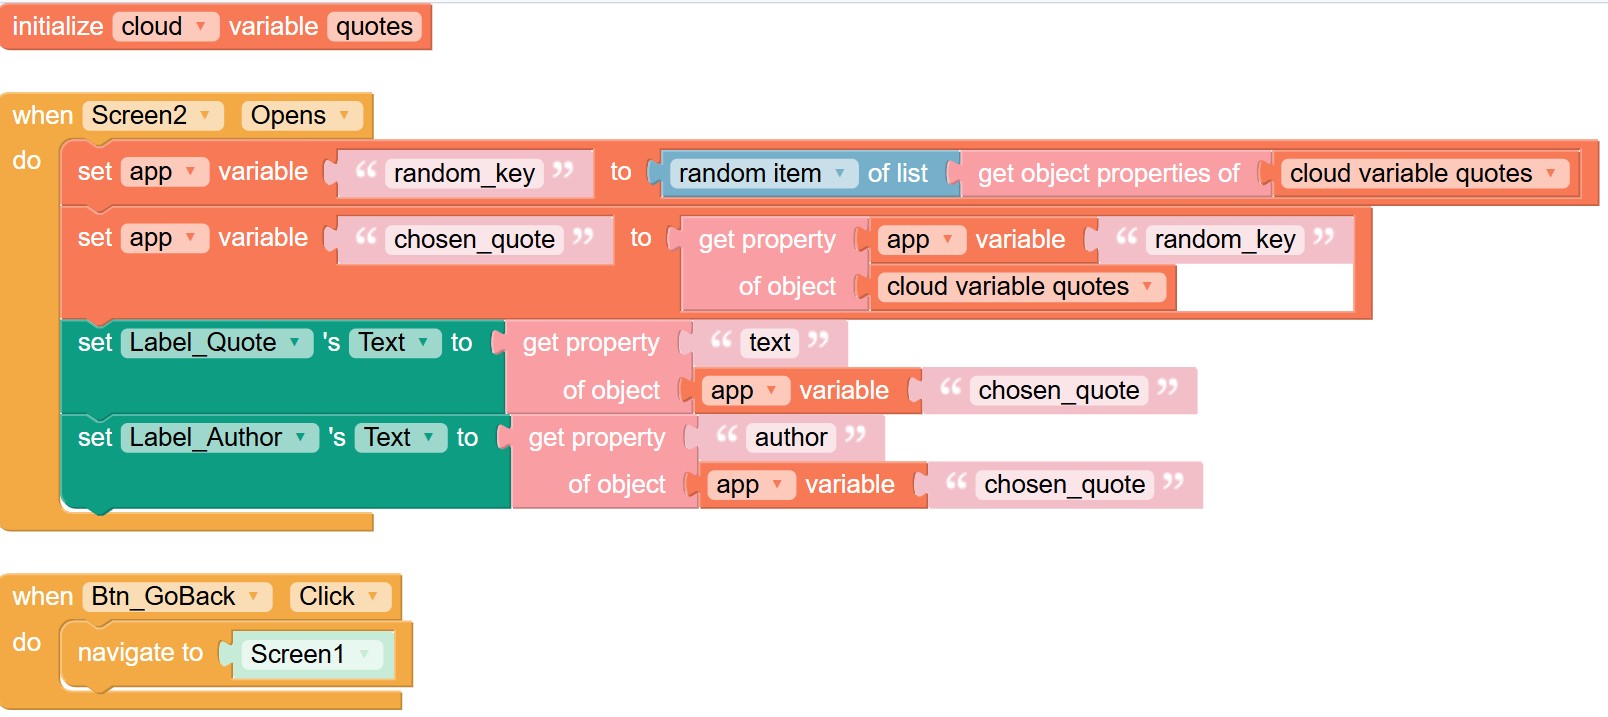
<ol>
  <li>Allez dans <em>Variables</em> et prenez le bloc <code class="language-plaintext highlighter-rouge">initialize cloud variable name</code>. Nommez-la <code class="language-plaintext highlighter-rouge">"citations"</code> (cela doit correspondre <em>exactement</em> au nom racine de notre JSON dans Firebase pour que Thunkable fasse la synchronisation automatiquement).</li>
  <li>Prenez le bloc <code class="language-plaintext highlighter-rouge">when Screen2 Opens do</code>.</li>
  <li>À l’intérieur, nous allons d’abord lister nos clés. Créez une variable temporaire <code class="language-plaintext highlighter-rouge">cle_aleatoire</code>. Assignez-lui le bloc <code class="language-plaintext highlighter-rouge">random item of list</code>. La liste à fournir sera générée par le bloc <code class="language-plaintext highlighter-rouge">get object properties of</code> (dans la catégorie <em>Objects</em>) appliqué à notre variable <code class="language-plaintext highlighter-rouge">cloud citations</code>.</li>
  <li>Maintenant que nous avons une clé au hasard (ex: <em>quote_002</em>), créons une variable <code class="language-plaintext highlighter-rouge">citation_choisie</code>. Assignez-lui la propriété (bloc <code class="language-plaintext highlighter-rouge">get property of object</code>) correspondant à <code class="language-plaintext highlighter-rouge">cle_aleatoire</code> extraite de notre variable cloud <code class="language-plaintext highlighter-rouge">citations</code>.</li>
  <li>Enfin, mettez à jour vos labels ! Attribuez au <code class="language-plaintext highlighter-rouge">Label_Quote</code> la propriété <code class="language-plaintext highlighter-rouge">"texte"</code> de l’objet <code class="language-plaintext highlighter-rouge">citation_choisie</code>, et au <code class="language-plaintext highlighter-rouge">Label_Author</code> sa propriété <code class="language-plaintext highlighter-rouge">"auteur"</code>.</li>
  <li>Prenez le bloc <code class="language-plaintext highlighter-rouge">when Btn_Retour Clicks do</code> et glissez à l’intérieur le bloc <code class="language-plaintext highlighter-rouge">Navigate to Screen1</code>.</li>
</ol>

<p><img src="/content/images/thunkable_firebase_blocks.jpg" alt="Blocs logiques Thunkable avec Firebase" style="display: block; margin: 0 auto;" /><br /></p>

<h2 id="étape-4--tester-la-bête-">Étape 4 : Tester la bête !</h2>
<p>Pas besoin de compiler !</p>
<ul>
  <li>Téléchargez l’application <strong>Thunkable Live</strong> sur votre smartphone (iOS ou Android).</li>
  <li>Connectez-vous avec votre compte. Touchez votre projet et testez : vous devriez voir une nouvelle citation tirée directement de votre base de données Cloud à chaque essai 😉</li>
</ul>

<hr />

<h1 id="conclusion">Conclusion</h1>

<p>Et voilà ! Vous avez créé une véritable application mobile connectée à un backend professionnel. L’avantage énorme de cette architecture, c’est que vous pouvez maintenant ajouter, modifier ou supprimer des citations directement depuis la console Firebase, et l’application de vos utilisateurs se mettra à jour instantanément, sans qu’ils n’aient à la retélécharger.</p>

<p>Mais pourquoi s’arrêter en si bon chemin ? Dans <strong><a href="/2026/03/18/thunkable-tuto-partie-2.html">la partie 2 de ce tutoriel</a></strong>, nous allons remplacer notre base Firebase par l’API de l’intelligence artificielle Gemini. Notre application ne se contentera plus de lire des citations, elle les inventera sur mesure ! Restez à l’écoute.</p>]]></content><author><name>Geoff RÉAU</name><email>contact@reau.ca</email></author><category term="Tutorials" /><category term="No-Code" /><category term="Thunkable" /><category term="Firebase" /><category term="Développement Mobile" /><category term="Tutoriel" /><category term="Application" /><category term="No-Code" /><summary type="html"><![CDATA[Depuis cette année, j’ai l’occasion d’agir comme mentor pour le programme Technovation Montréal. Voir des équipes passer d’une simple idée à un prototype mobile fonctionnel en quelques semaines m’a rappelé une chose essentielle : le no-code est un levier d’innovation absolument fantastique. Même lorsque l’on ambitionne de développer soi-même des applications mobiles de A à Z avec des frameworks avancés comme React Native, passer par ces plateformes visuelles permet de valider une architecture backend et une logique d’interface en un éclair 🙂 Pour joindre le geste à la parole, je vous propose une nouvelle série de deux tutoriels pour créer une application mobile iOS/Android dynamique et connectée au Cloud, sans écrire une seule ligne de code classique.]]></summary><media:thumbnail xmlns:media="http://search.yahoo.com/mrss/" url="https://www.reau.ca/content/images/thunkable-tuto-part1.jpg" /><media:content medium="image" url="https://www.reau.ca/content/images/thunkable-tuto-part1.jpg" xmlns:media="http://search.yahoo.com/mrss/" /></entry><entry xml:lang="en"><title type="html">10-mn tuto: Install a local LLM on Windows with Ollama</title><link href="https://www.reau.ca/2025/07/11/tuto-10mn-ollama-windows-en.html" rel="alternate" type="text/html" title="10-mn tuto: Install a local LLM on Windows with Ollama" /><published>2025-07-11T04:30:00+00:00</published><updated>2025-07-11T04:30:00+00:00</updated><id>https://www.reau.ca/2025/07/11/tuto-10mn-ollama-windows-en</id><content type="html" xml:base="https://www.reau.ca/2025/07/11/tuto-10mn-ollama-windows-en.html"><![CDATA[<p><img src="/content/images/ollama-tuto.jpg" alt="10-min tuto - Local LLM on Windows with Ollama" style="display: block; margin: 0 auto;" /></p>

<p>In the previous post, I suggested some approaches to help as many people as possible understand the latest innovations in AI. Now, it only makes sense to set a good example from a tech popularization perspective 🙂</p>

<p>As the post title suggests, here’s a quick, simple, and effective tutorial to install your own large language model instance, or LLM, locally on a Windows PC using <a href="https://ollama.com/">Ollama</a>.
<!--more--></p>

<hr />
<p><strong><em>Foreword</em></strong>: <em>This article, enhanced with improvements generated by AI (<a href="https://www.napkin.ia">Napkin</a> , <a href="https://ai.google/">Google AI</a>, <a href="https://www.perplexity.ai/">Perplexity</a>), is made available under the</em> <span xmlns:cc="http://creativecommons.org/ns#"><i><a href="https://creativecommons.org/licenses/by-nd/4.0/?ref=chooser-v1" target="_blank" rel="license noopener noreferrer" style="display:inline-block;">CC BY-ND 4.0<img style="height:22px!important;margin-left:3px;vertical-align:text-bottom;" src="https://mirrors.creativecommons.org/presskit/icons/cc.svg?ref=chooser-v1" alt="" /><img style="height:22px!important;margin-left:3px;vertical-align:text-bottom;" src="https://mirrors.creativecommons.org/presskit/icons/by.svg?ref=chooser-v1" alt="" /><img style="height:22px!important;margin-left:3px;vertical-align:text-bottom;" src="https://mirrors.creativecommons.org/presskit/icons/nd.svg?ref=chooser-v1" alt="" /></a></i></span></p>

<hr />
<h1 id="what-is-an-llm">What is an LLM?</h1>
<p>Great question, thanks for asking 😀
An LLM (Large Language Model) is an artificial intelligence model trained on massive amounts of text data to understand and generate human language, learning to predict the next words in a sequence.</p>

<p>Among the best-known models for the general public:</p>

<ul>
  <li>Available through <a href="https://chatgpt.com/">ChatGPT</a>, OpenAI’s GPT models (<a href="https://openai.com/fr-FR/index/gpt-4o-system-card/">GPT-4o</a>, <a href="https://openai.com/index/introducing-o3-and-o4-mini/">o3 and o4-mini</a>).</li>
  <li><a href="https://x.ai/grok">Grok</a>, by xAI, fully integrated into X.</li>
  <li><a href="https://deepmind.google/models/gemini/">Google Gemini</a>, featured in Google tools like Gmail, Google Drive, Google Docs, etc.</li>
  <li><a href="https://www.llama.com/">LLama</a> models from Meta, fully integrated into Facebook, Instagram, and WhatsApp, and open-sourced since LLama 2 in July 2023 (<a href="https://github.com/meta-llama/llama">GitHub repo</a>).</li>
</ul>

<p>From this core capability, the applications of these AI models are numerous:</p>
<picture>
  <source srcset="/content/images/llm_apps_d_en.svg" media="(prefers-color-scheme: dark)" />
  <source srcset="/content/images/llm_apps_en.svg" media="(prefers-color-scheme: light)" />
  <img src="/content/images/llm_apps_en.svg" alt="Versatile applications of LLM" style="display: block; margin: 0 auto;" />
</picture>

<ul>
  <li><strong>Advanced chatbots</strong>
    <ul>
      <li>Automated customer support,</li>
      <li>Interactive FAQ.</li>
    </ul>
  </li>
  <li><strong>Large-scale data processing</strong>
    <ul>
      <li>Summarization,</li>
      <li>Extraction, refinement, and classification.</li>
    </ul>
  </li>
  <li><strong>Automatic translation</strong>
    <ul>
      <li>For my previous article, I was glad to have access to LLMs to translate Chinese academic papers!</li>
    </ul>
  </li>
  <li><strong>Code generation</strong>
    <ul>
      <li>Widely used for coding assistance, I use <a href="https://github.com/features/copilot">GitHub Copilot</a> to harmonize <a href="https://github.com/RFC2784/rfc2784.github.io/blob/main/_posts/">this blog’s Markdown code</a>!</li>
    </ul>
  </li>
  <li><strong>Reasoning simulation</strong>
    <ul>
      <li>The latest achievements in this area are really interesting. Besides the <a href="https://github.com/deepseek-ai/DeepSeek-R1">DeepSeek-R1</a> model, I experiment a lot with <a href="https://support.google.com/gemini/answer/15719111?hl=fr&amp;sjid=8249538743889943279-NA">Gemini Pro 2.5’s Deep Search</a>.</li>
    </ul>
  </li>
</ul>

<h1 id="10-minutes-flat-to-install-an-llm-on-a-windows-pcis-it-possible">10 minutes flat to install an LLM on a Windows PC—is it possible?</h1>

<h2 id="really">Really?</h2>

<p>OK, you won’t be running inferences with hundreds of billions of parameters on your laptop, let alone commercial models, but you can easily run smaller, yet powerful enough LLMs for fun!</p>

<h2 id="whats-the-point-of-a-local-llm">What’s the point of a local LLM?</h2>

<p>Personally, I see only benefits:</p>
<picture>
  <source srcset="/content/images/llm_perks_d_en.svg" media="(prefers-color-scheme: dark)" />
  <source srcset="/content/images/llm_perks_en.svg" media="(prefers-color-scheme: light)" />
  <img src="/content/images/llm_perks_en.svg" alt="Advantages of a local LLM" style="display: block; margin: 0 auto;" />
</picture>

<ul>
  <li>Access to a <strong>wide range of recent open-source LLMs</strong>, including reasoning models like <a href="https://github.com/deepseek-ai/DeepSeek-R1">DeepSeek-R1</a> or <a href="https://github.com/QwenLM/Qwen3">Qwen 3</a>.</li>
  <li><strong>Guaranteed privacy</strong>: once the model is on your PC, no data leaves your computer, protecting all exchanges with the model (texts, images).</li>
  <li><strong>No subscription</strong> for available features.</li>
  <li><strong>Give a second life to older PCs</strong>. For example, I repurposed an old laptop with a Core i5 and 16 GB RAM as a personal server with Ubuntu, and I run a small model on it!</li>
</ul>

<h2 id="what-are-the-components">What are the components?</h2>

<h3 id="ollama">Ollama</h3>

<p>Available on Linux, MacOS, Windows, and Docker, this open-source software platform allows you to manage and run language models locally.</p>

<ul>
  <li>Website: <a href="https://ollama.com">https://ollama.com</a></li>
  <li>Discord: <a href="https://discord.com/invite/ollama">https://discord.com/invite/ollama</a></li>
  <li>List of available models: <a href="https://ollama.com/library">https://ollama.com/library</a>
    <ul>
      <li>You can sign up <a href="https://ollama.com/signup">here</a> to publish and share your own models.</li>
    </ul>
  </li>
  <li>GitHub repo: <a href="https://github.com/ollama/ollama">https://github.com/ollama/ollama</a></li>
</ul>

<h3 id="hollama---webchat-client-for-ollama">Hollama - Webchat Client for Ollama</h3>

<p>Also available on Linux, MacOS, Windows, and Docker, this app is a webchat client compatible with Ollama and OpenAI.</p>

<ul>
  <li>GitHub repo: <a href="https://github.com/fmaclen/hollama">https://github.com/fmaclen/hollama</a></li>
  <li>Live demo: <a href="https://hollama.fernando.is/">https://hollama.fernando.is/</a></li>
</ul>

<p>I chose Hollama for its ease of use, especially for loading new models directly through the graphical interface.</p>

<h3 id="system-requirements">System Requirements</h3>

<p>No need for a dedicated graphics card or a Copilot+ PC; the following config is enough to get started!</p>

<table>
  <thead>
    <tr>
      <th style="text-align: left">Component</th>
      <th style="text-align: left">Minimum configuration</th>
    </tr>
  </thead>
  <tbody>
    <tr>
      <td style="text-align: left">Operating System</td>
      <td style="text-align: left">Microsoft Windows 10 or Windows 11, Home or Pro edition, up to date with the latest patches</td>
    </tr>
    <tr>
      <td style="text-align: left">CPU</td>
      <td style="text-align: left">4 cores, Intel/AMD, x86-64</td>
    </tr>
    <tr>
      <td style="text-align: left">RAM</td>
      <td style="text-align: left">8GB</td>
    </tr>
    <tr>
      <td style="text-align: left">Storage</td>
      <td style="text-align: left">10GB available</td>
    </tr>
    <tr>
      <td style="text-align: left">Internet connectivity</td>
      <td style="text-align: left">Required for installing components and downloading language models.</td>
    </tr>
  </tbody>
</table>

<p>I validated this tutorial on virtual machines using this minimum configuration, so you can proceed with confidence 😉</p>

<h3 id="language-model-used-in-the-tutorial---gemma31b-it-qat">Language model used in the tutorial - gemma3:1b-it-qat</h3>
<p><strong>gemma3:1b-it-qat</strong> refers to a lightweight and efficient version of Google’s open-source <a href="https://deepmind.google/models/gemma/gemma-3/">Gemma 3</a> model:</p>

<ul>
  <li><u>1 billion parameters (“1b”)</u>.</li>
  <li><u>Instruction-tuned ("it")</u>: Optimized to follow instructions and respond conversationally, <strong>this model is ideal for text generation, summarization, and translation</strong>.</li>
  <li><u>Quantization-Aware Trained ("qat")</u>: Trained to support quantization (e.g., 4-bit), which <strong>greatly reduces memory requirements while maintaining quality close to larger models</strong>.</li>
</ul>

<h2 id="how-do-you-do-it-step-by-step-guide">How do you do it? (Step-by-step guide)</h2>
<h3 id="open-powershell-as-administrator">Open PowerShell as administrator</h3>
<ul>
  <li>
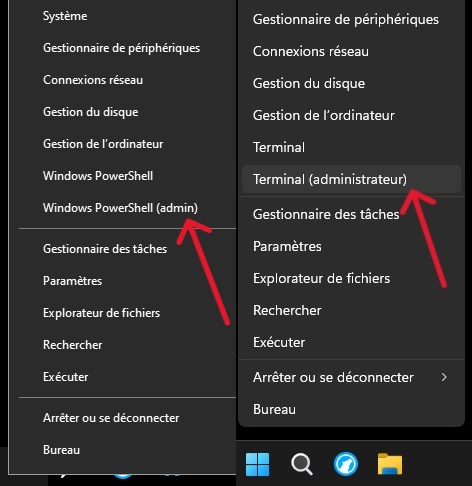
    <p>Right-click the Start menu and select “Terminal (Admin)” or “Windows PowerShell (Admin)”.
<img src="/content/images/pshell_adm.jpg" alt="" style="display: block; margin: 0 auto;" /><br /></p>
  </li>
  <li>
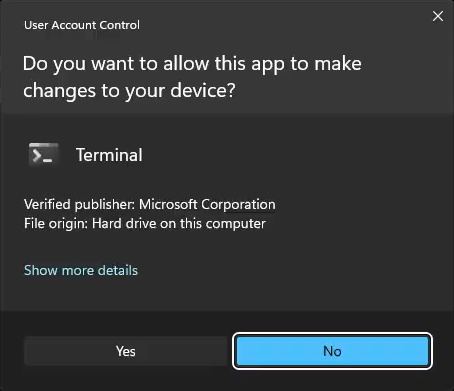
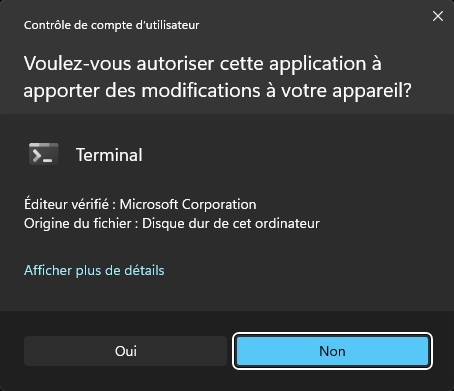
    <p>Click [Yes] to accept privilege elevation.</p>
  </li>
</ul>

<p><img src="/content/images/pshell_adm_uac_en.jpg" alt="" style="display: block; margin: 0 auto;" /><br /></p>

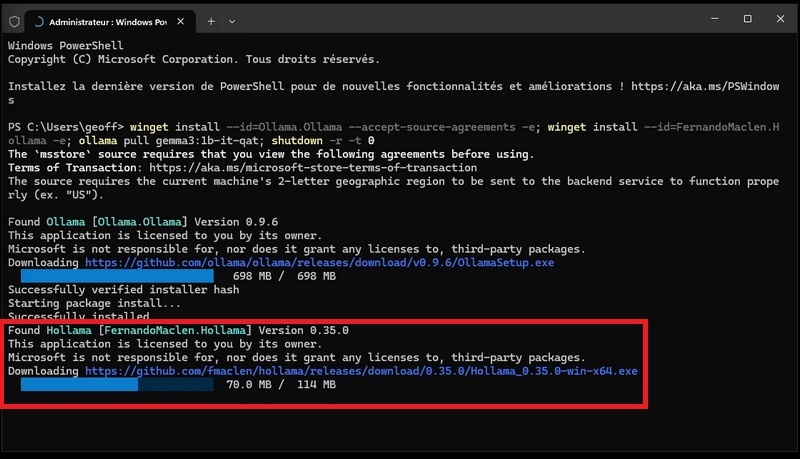
<h3 id="install-a-local-ollama-instance-install-the-gui-and-fetch-the-gemma31b-it-qat-model-in-a-single-command">Install a local Ollama instance, install the GUI, and fetch the gemma3:1b-it-qat model in a single command</h3>

<ul>
  <li>Run this command:</li>
</ul>

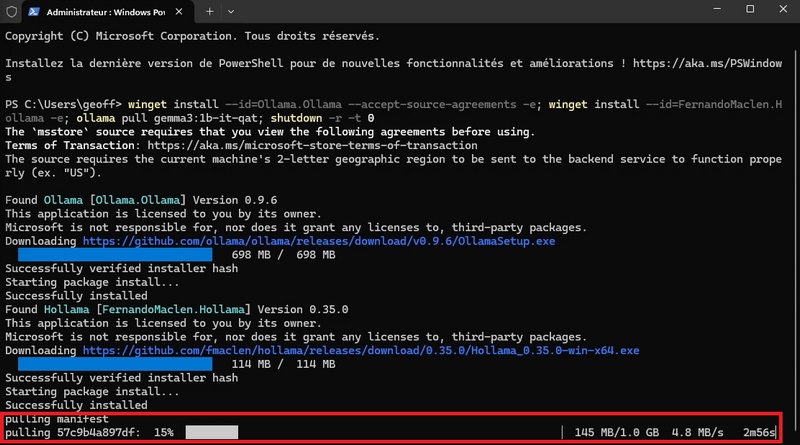
<figure class="highlight"><pre><code class="language-powershell" data-lang="powershell"><span class="n">winget</span><span class="w"> </span><span class="nx">install</span><span class="w"> </span><span class="nt">--id</span><span class="o">=</span><span class="n">Ollama.Ollama</span><span class="w"> </span><span class="nt">--accept-source-agreements</span><span class="w"> </span><span class="nt">-e</span><span class="p">;</span><span class="w"> </span><span class="n">winget</span><span class="w"> </span><span class="nx">install</span><span class="w"> </span><span class="nt">--id</span><span class="o">=</span><span class="n">FernandoMaclen.Hollama</span><span class="w"> </span><span class="nt">-e</span><span class="p">;</span><span class="w"> </span><span class="n">ollama</span><span class="w"> </span><span class="nx">pull</span><span class="w"> </span><span class="nx">gemma3:1b-it-qat</span><span class="p">;</span><span class="w"> </span><span class="n">shutdown</span><span class="w"> </span><span class="nt">-r</span><span class="w"> </span><span class="nt">-t</span><span class="w"> </span><span class="nx">0</span></code></pre></figure>
<p><br /></p>

<ul>
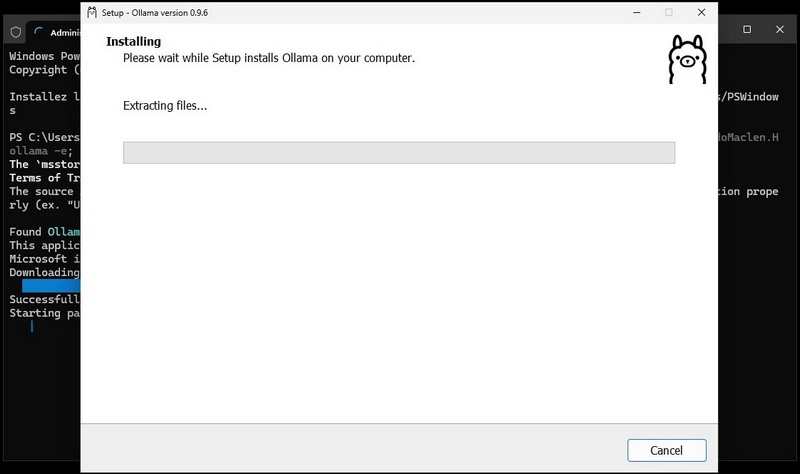
  <li>Once the package is downloaded and verified, the Ollama instance installation process begins, and the Ollama installer GUI appears.</li>
</ul>

<p><img src="/content/images/ollama_installer_ui.jpg" alt="" style="display: block; margin: 0 auto;" /><br /></p>

<ul>
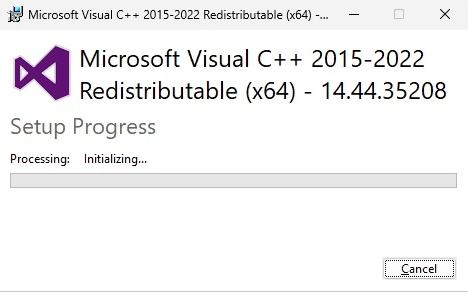
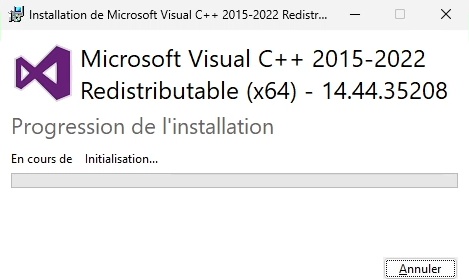
  <li>During the final steps of this first installation process, the Microsoft C++ 2015/2022 Redistributable may be installed automatically if not already present.</li>
</ul>

<p><img src="/content/images/cpp_install_en.jpg" alt="" style="display: block; margin: 0 auto;" /><br /></p>

<ul>
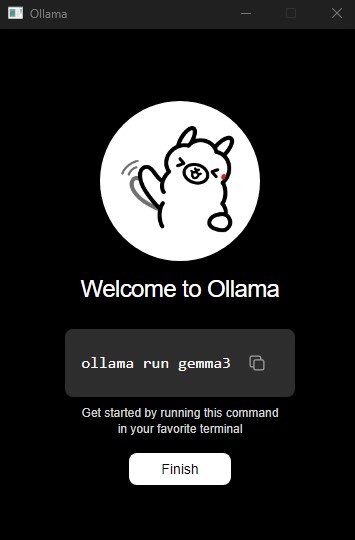
  <li>At the end of the Ollama instance installation, a welcome window appears. Click [Finish] to close it.</li>
</ul>

<p><img src="/content/images/ollama_welcome.jpg" alt="" style="display: block; margin: 0 auto;" /><br /></p>

<ul>
  <li>With the local Ollama instance installed, the Hollama GUI installation proceeds automatically.</li>
</ul>

<p><img src="/content/images/hollama_installer.jpg" alt="" style="display: block; margin: 0 auto;" /><br /></p>

<ul>
  <li>Once this installation process is complete, the <strong>gemma3:1b-it-qat</strong> model download to the local Ollama instance starts automatically.</li>
</ul>

<p><img src="/content/images/gemma3_dl.jpg" alt="" style="display: block; margin: 0 auto;" /><br /></p>

<ul>
  <li>Once the model is downloaded, the system will automatically restart. After rebooting, you’ll see the Hollama app icon on the Desktop.</li>
</ul>

<p><img src="/content/images/hollama_icon.jpg" alt="" style="display: block; margin: 0 auto;" /></p>
<h3 id="finalize-installation">Finalize installation</h3>
<ul>
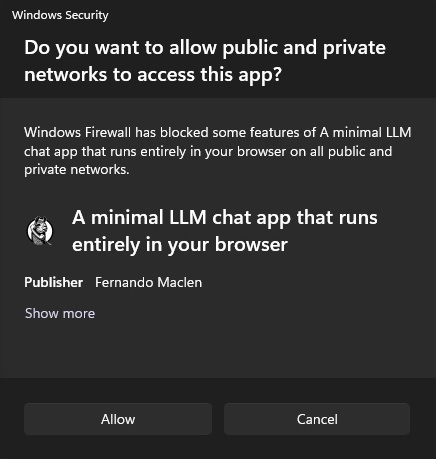
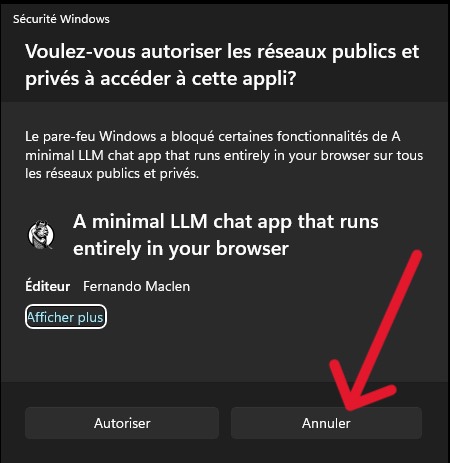
  <li>Double-click the Hollama icon on the desktop to launch the GUI. A Windows Firewall notification appears; click [Cancel] to block incoming connections.</li>
</ul>

<p><img src="/content/images/hollama_fw_en.jpg" alt="" style="display: block; margin: 0 auto;" /><br /></p>

<ul>
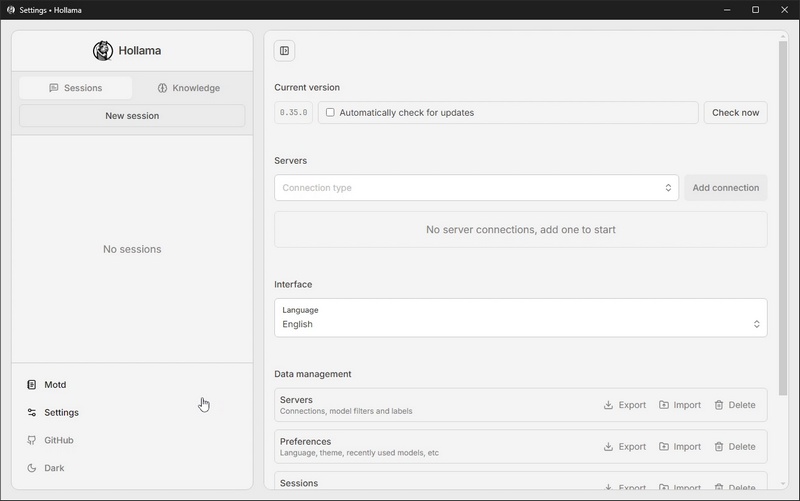
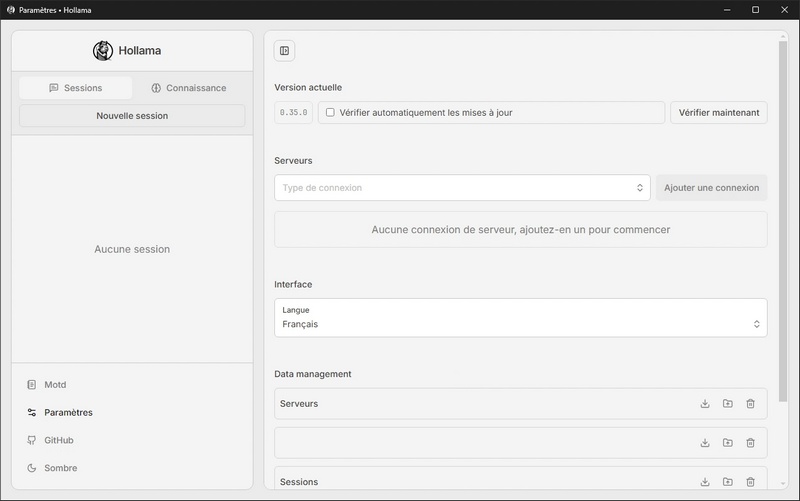
  <li>Once the app starts, it opens directly in the settings interface.</li>
</ul>

<p><img src="/content/images/hollama_ui_en.jpg" alt="" style="display: block; margin: 0 auto;" /><br /></p>

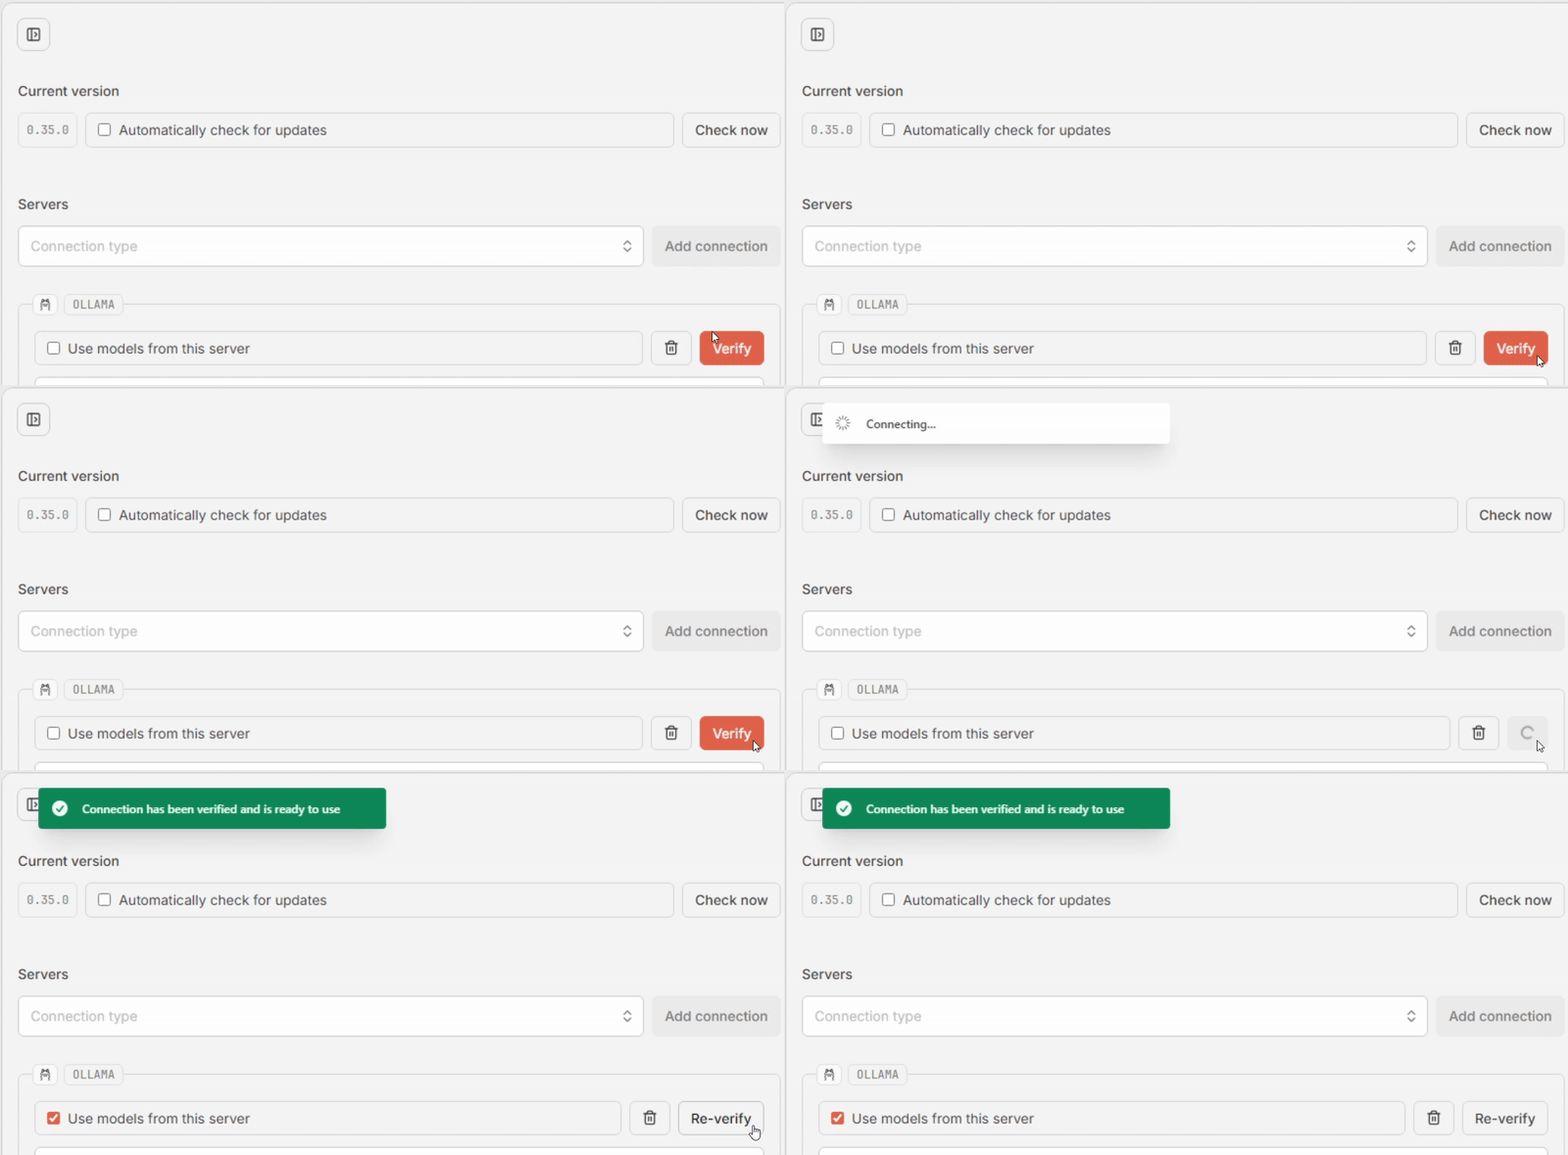
<ul>
  <li>In the Servers section, select “Ollama” in the “Connection type” dropdown, then click [Add connection].</li>
</ul>

<p><img src="/content/images/ollama_server_en.gif" alt="" style="display: block; margin: 0 auto;" /><br /></p>

<ul>
  <li>Click [Verify]. If all goes well, the message “Connection has been verified and is ready to use.” appears in a green box at the top, and the “Use models from this server” box is checked automatically.</li>
</ul>

<p><img src="/content/images/ollama_verified_en.gif" alt="" style="display: block; margin: 0 auto;" /><br /></p>

<h3 id="test-your-first-prompt">Test your first prompt</h3>
<ul>
  <li>In the left menu, click [New session].</li>
</ul>

<p><img src="/content/images/hollama_new_session_en.jpg" alt="" style="display: block; margin: 0 auto;" /><br /></p>

<ul>
  <li>Make sure the model is present in the dropdown, write your prompt, click [Run]. Wait a few seconds, and voilà—magic 😀</li>
</ul>

<p><img src="/content/images/hollama_chat_en.webp" alt="" style="display: block; margin: 0 auto;" /><br /></p>

<h3 id="how-to-download-other-models-with-the-gui">How to download other models with the GUI?</h3>
<ul>
  <li>Go back to the Hollama app settings.</li>
  <li>Under the “Ollama” connection settings, click the “Ollama’s Library” link. In the new window, browse the available model catalog, copy the identifier of the model you want to load (e.g., <strong>qwen3:0.6b</strong>), then close this window.</li>
</ul>

<p><img src="/content/images/ollama_library_en.jpg" alt="" style="display: block; margin: 0 auto;" /><br /></p>

<ul>
  <li>Back in the “Ollama” connection settings, paste the model identifier into the “Pull model” textbox, then click the red button to start loading.</li>
</ul>

<p><img src="/content/images/ollama_pull_model_en.jpg" alt="" style="display: block; margin: 0 auto;" /><br /></p>

<ul>
  <li>An info message appears at the top to show progress. The new model will be loaded and ready to use when the message turns green.</li>
</ul>

<p><img src="/content/images/ollama_model_ok_en.jpg" alt="" style="display: block; margin: 0 auto;" /><br /></p>

<ul>
  <li>You can now select and use this new model in conversation sessions.</li>
</ul>

<p><img src="/content/images/ollama_model_list_en.jpg" alt="" style="display: block; margin: 0 auto;" /><br /></p>

<h3 id="if-needed-completely-remove-installed-components">(If needed) Completely remove installed components</h3>
<ul>
  <li>Open PowerShell as administrator (<a href="#open-powershell-as-administrator">see first step</a>),</li>
  <li>Run the following command to remove all installed components (apps and models):</li>
</ul>

<figure class="highlight"><pre><code class="language-powershell" data-lang="powershell"><span class="n">winget</span><span class="w"> </span><span class="nx">uninstall</span><span class="w"> </span><span class="nt">--id</span><span class="o">=</span><span class="n">Ollama.Ollama</span><span class="w"> </span><span class="p">;</span><span class="w"> </span><span class="n">winget</span><span class="w"> </span><span class="nx">uninstall</span><span class="w"> </span><span class="nt">--id</span><span class="o">=</span><span class="n">FernandoMaclen.Hollama</span><span class="p">;</span><span class="w"> </span><span class="n">winget</span><span class="w"> </span><span class="nx">source</span><span class="w"> </span><span class="nx">reset</span><span class="w"> </span><span class="nt">--force</span><span class="p">;</span><span class="w"> </span><span class="n">rm</span><span class="w"> </span><span class="nv">$</span><span class="nn">env</span><span class="p">:</span><span class="nv">USERPROFILE</span><span class="nx">\</span><span class="o">*</span><span class="nx">ollama</span><span class="o">*</span><span class="w"> </span><span class="nt">-R</span><span class="p">;</span><span class="w"> </span><span class="n">rm</span><span class="w"> </span><span class="nv">$</span><span class="nn">env</span><span class="p">:</span><span class="nv">USERPROFILE</span><span class="nx">\AppData\Local\</span><span class="o">*</span><span class="nx">ollama</span><span class="o">*</span><span class="w"> </span><span class="nt">-R</span><span class="p">;</span><span class="w"> </span><span class="n">rm</span><span class="w"> </span><span class="nv">$</span><span class="nn">env</span><span class="p">:</span><span class="nv">USERPROFILE</span><span class="nx">\AppData\Local\Temp</span><span class="w"> </span><span class="nt">-R</span><span class="p">;</span><span class="w"> </span><span class="n">rm</span><span class="w"> </span><span class="nv">$</span><span class="nn">env</span><span class="p">:</span><span class="nv">USERPROFILE</span><span class="nx">\AppData\Roaming\</span><span class="o">*</span><span class="nx">ollama</span><span class="o">*</span><span class="w"> </span><span class="nt">-R</span><span class="p">;</span><span class="w"> </span><span class="n">shutdown</span><span class="w"> </span><span class="nt">-r</span><span class="w"> </span><span class="nt">-t</span><span class="w"> </span><span class="nx">0</span></code></pre></figure>

<ul>
  <li>Once the components are uninstalled, the system will automatically</li>
</ul>

<hr />

<h2 id="conclusion">Conclusion</h2>

<p>In just a few minutes, you can now experiment with the power of local LLMs on your Windows PC, without any subscription or cloud dependency. Whether for learning, coding assistance, or simply exploring the latest advances in artificial intelligence, Ollama and Hollama offer a simple and accessible solution.</p>

<p>Don’t hesitate to try out different models and share your feedback or discoveries!</p>]]></content><author><name>Geoff RÉAU</name><email>contact@reau.ca</email></author><category term="Artificial Intelligence" /><category term="Tutorials" /><category term="Artificial Intelligence" /><category term="AI" /><category term="Large Language Model" /><category term="LLM" /><category term="Tutorial" /><category term="Ollama" /><summary type="html"><![CDATA[In the previous post, I suggested some approaches to help as many people as possible understand the latest innovations in AI. Now, it only makes sense to set a good example from a tech popularization perspective 🙂 As the post title suggests, here’s a quick, simple, and effective tutorial to install your own large language model instance, or LLM, locally on a Windows PC using Ollama.]]></summary><media:thumbnail xmlns:media="http://search.yahoo.com/mrss/" url="https://www.reau.ca/content/images/ollama-tuto.jpg" /><media:content medium="image" url="https://www.reau.ca/content/images/ollama-tuto.jpg" xmlns:media="http://search.yahoo.com/mrss/" /></entry><entry xml:lang="fr"><title type="html">10-mn tuto : Installer un LLM local sur Windows avec Ollama</title><link href="https://www.reau.ca/2025/07/11/tuto-10mn-ollama-windows.html" rel="alternate" type="text/html" title="10-mn tuto : Installer un LLM local sur Windows avec Ollama" /><published>2025-07-11T04:30:00+00:00</published><updated>2025-07-11T04:30:00+00:00</updated><id>https://www.reau.ca/2025/07/11/tuto-10mn-ollama-windows</id><content type="html" xml:base="https://www.reau.ca/2025/07/11/tuto-10mn-ollama-windows.html"><![CDATA[<p><img src="/content/images/ollama-tuto.jpg" alt="10-mn tuto - LLM local sur Windows avec Ollama" style="display: block; margin: 0 auto;" /></p>

<p>Dans le post précédent, j’ai proposé des angles d’approche pour permettre au plus grand nombre d’appréhender les dernières innovations en termes d’IA. Maintenant, il est somme toute logique que je donne le bon exemple sous l’angle de la vulgarisation techno 🙂</p>

<p>Comme le suggère le titre du post, je vous propose un tutoriel rapide, simple et efficace pour installer votre propre instance de grand modèle de langage, ou LLM, localement sur un PC sous Windows en utilisant <a href="https://ollama.com/">Ollama</a>.
<!--more--></p>

<hr />
<p><strong><em>Avant-propos</em></strong>: <em>Cet article, augmenté d’améliorations générées avec des IA (<a href="https://www.napkin.ia">Napkin</a> , <a href="https://ai.google/">Google AI</a>, <a href="https://www.perplexity.ai/">Perplexity</a>), est mis à disposition au travers de la license</em> <span xmlns:cc="http://creativecommons.org/ns#"><i><a href="https://creativecommons.org/licenses/by-nd/4.0/?ref=chooser-v1" target="_blank" rel="license noopener noreferrer" style="display:inline-block;">CC BY-ND 4.0<img style="height:22px!important;margin-left:3px;vertical-align:text-bottom;" src="https://mirrors.creativecommons.org/presskit/icons/cc.svg?ref=chooser-v1" alt="" /><img style="height:22px!important;margin-left:3px;vertical-align:text-bottom;" src="https://mirrors.creativecommons.org/presskit/icons/by.svg?ref=chooser-v1" alt="" /><img style="height:22px!important;margin-left:3px;vertical-align:text-bottom;" src="https://mirrors.creativecommons.org/presskit/icons/nd.svg?ref=chooser-v1" alt="" /></a></i></span></p>

<hr />
<h1 id="cest-quoi-un-llm-">C’est quoi un LLM ?</h1>
<p>Très bonne question, merci de l’avoir posée 😀
Un LLM (Large Language Model) est un modèle d’intelligence artificielle entraîné sur d’énormes quantités de données textuelles pour comprendre et générer du langage humain, apprenant ainsi à prédire les mots suivants dans une séquence.</p>

<p>Parmi les modèles les plus connus du grand public :</p>

<ul>
  <li>Disponibles au travers de <a href="https://chatgpt.com/">ChatGPT</a>, les modèles GPT de OpenAI (<a href="https://openai.com/fr-FR/index/gpt-4o-system-card/">GPT-4o</a>, <a href="https://openai.com/index/introducing-o3-and-o4-mini/">o3 et o4-mini</a>).</li>
  <li><a href="https://x.ai/grok">Grok</a>, par xAI, qui est pleinement intégré à X.</li>
  <li><a href="https://deepmind.google/models/gemini/">Google Gemini</a>, mis en avant au travers des outils Google tels que Gmail,Google Drive, Google Docs, etc…</li>
  <li>Les modèles <a href="https://www.llama.com/">LLama</a> de Meta, qui sont pleinement intégrés à Facebook, Instagram et WhatsApp, sont rendus Open Source depuis la sortie de LLama 2 en juillet 2023 (<a href="https://github.com/meta-llama/llama">Dépôt GitHub</a>).</li>
</ul>

<p>À partir de cette capacité fondamentale, les applications de ces modèles IA sont nombreuses :</p>
<picture>
  <source srcset="/content/images/llm_apps_d.svg" media="(prefers-color-scheme: dark)" />
  <source srcset="/content/images/llm_apps.svg" media="(prefers-color-scheme: light)" />
  <img src="/content/images/llm_apps.svg" alt="Applications polyvalentes des LLM" style="display: block; margin: 0 auto;" />
</picture>

<ul>
  <li><strong>Chatbots avancés</strong>
    <ul>
      <li>support client automatisé,</li>
      <li>FAQ interactive.</li>
    </ul>
  </li>
  <li><strong>Traitement de données à grand volume</strong>
    <ul>
      <li>Résumés,</li>
      <li>Extraction, raffinage puis classification.</li>
    </ul>
  </li>
  <li><strong>Traduction automatique</strong>
    <ul>
      <li>Pour mon article précédent, j’étais bien content d’avoir accès à des LLM pour traduire des articles universitaires chinois !</li>
    </ul>
  </li>
  <li><strong>Génération de code informatique</strong>,
    <ul>
      <li>Beaucoup utilisé pour l’aide au codage, j’utilise <a href="https://github.com/features/copilot">GitHub Copilot</a> pour harmoniser <a href="https://github.com/RFC2784/rfc2784.github.io/blob/main/_posts/">le code Markdown de ce blog</a> !</li>
    </ul>
  </li>
  <li><strong>Simulation de raisonnement</strong>
    <ul>
      <li>Les dernières évolutions dans ce domaine sont vraiment intéressantes. Outre le modèle <a href="https://github.com/deepseek-ai/DeepSeek-R1">DeepSeek-R1</a>, j’expérimente beaucoup avec l’option de <a href="https://support.google.com/gemini/answer/15719111?hl=fr&amp;sjid=8249538743889943279-NA">Recherche Profonde de Gemini Pro 2.5</a>.</li>
    </ul>
  </li>
</ul>

<h1 id="10-minutes-chrono-pour-installer-un-llm-sur-un-pc-windows-cest-possible-">10 minutes chrono pour installer un LLM sur un PC Windows, c’est possible !</h1>

<h2 id="vraiment-">Vraiment ?</h2>

<p>OK, c’est sûr que vous n’allez pas faire tourner des inférences avec des centaines de milliards de paramètres sur votre laptop, et encore moins des modèles commerciaux, mais pas de souci pour faire tourner des LLM plus modestes mais suffisamment performants pour s’amuser !</p>

<h2 id="cest-quoi-lintérêt-dun-llm-local-">C’est quoi l’intérêt d’un LLM local ?</h2>

<p>Personnellement, je n’y vois que des avantages</p>
<picture>
  <source srcset="/content/images/llm_perks_d.svg" media="(prefers-color-scheme: dark)" />
  <source srcset="/content/images/llm_perks.svg" media="(prefers-color-scheme: light)" />
  <img src="/content/images/llm_perks.svg" alt="Les avantages d'un LLM local" style="display: block; margin: 0 auto;" />
</picture>

<ul>
  <li>Accès à une <strong>multitude de LLM Open Source récents</strong>, y compris des modèles de raisonnement comme <a href="https://github.com/deepseek-ai/DeepSeek-R1">DeepSeek-R1</a> ou <a href="https://github.com/QwenLM/Qwen3">Qwen 3</a>.</li>
  <li><strong>Confidentialité garantie</strong> : une fois le modèle sur le PC, aucune donnée ne quitte l’ordinateur, protégeant ainsi les données échangées avec le modèle (textes, images).</li>
  <li><strong>Pas d’abonnement</strong> pour les fonctionnalités disponibles.</li>
  <li><strong>Possibilité de redonner un second souffle à des PC un peu moins récents</strong>. Pour exemple, j’ai reconditionné un vieux laptop avec un Core-I5 et 16 GB de RAM en serveur perso avec une distri Ubuntu, et je fais tourner un petit modèle dessus !</li>
</ul>

<h2 id="cest-quoi-les-composants-">C’est quoi les composants ?</h2>

<h3 id="ollama">Ollama</h3>

<p>Disponible sur Linux, MacOs, WIndows et Docker, cette plateforme logicielle Open Source permet la gestion et l’exécution locale de modèles de langage.</p>

<ul>
  <li>Site web : <a href="https://ollama.com">https://ollama.com</a></li>
  <li>Discord : <a href="https://discord.com/invite/ollama">https://discord.com/invite/ollama</a></li>
  <li>Liste des modèles disponibles : <a href="https://ollama.com/library">https://ollama.com/library</a>
    <ul>
      <li>Il est possible de s’inscrire <a href="https://ollama.com/signup">ici</a> pour publier et partager ses propres modèles.</li>
    </ul>
  </li>
  <li>Dépot GitHub : <a href="https://github.com/ollama/ollama">https://github.com/ollama/ollama</a></li>
</ul>

<h3 id="hollama---client-webchat-pour-ollama">Hollama - Client Webchat pour Ollama</h3>

<p>Disponible également sur Linux, MacOs, WIndows et Docker, cette application est un client Webchat compatible Ollama et OpenAI.</p>

<ul>
  <li>Dépot GitHub : <a href="https://github.com/fmaclen/hollama">https://github.com/fmaclen/hollama</a></li>
  <li>Live demo : <a href="https://hollama.fernando.is/">https://hollama.fernando.is/</a></li>
</ul>

<p>J’ai choisi Hollama pour sa simplicité d’utilisation, notamment pour charger de nouveaux modèles directement au travers de l’interface graphique.</p>

<h3 id="prérequis-système">Prérequis système</h3>

<p>Pas besoin d’une carte graphique dédiée ou d’un PC Copilot +, la config suivante vous permet de faire vos premières armes !</p>

<table>
  <thead>
    <tr>
      <th style="text-align: left">Composant</th>
      <th style="text-align: left">Configuration minimale</th>
    </tr>
  </thead>
  <tbody>
    <tr>
      <td style="text-align: left">Système d’exploitation</td>
      <td style="text-align: left">Microsoft Windows 10 ou Windows 11, édition Famille ou Professionnel, maintenu à jour avec les derniers correctifs</td>
    </tr>
    <tr>
      <td style="text-align: left">CPU</td>
      <td style="text-align: left">4 coeurs, Intel/AMD, x86-64</td>
    </tr>
    <tr>
      <td style="text-align: left">RAM</td>
      <td style="text-align: left">8GB</td>
    </tr>
    <tr>
      <td style="text-align: left">Stockage</td>
      <td style="text-align: left">10GB disponibles</td>
    </tr>
    <tr>
      <td style="text-align: left">Connectivité Internet</td>
      <td style="text-align: left">Requise pour l’installation des composants et le téléchargement des modèles de langage.</td>
    </tr>
  </tbody>
</table>

<p>J’ai validé ce tutoriel sur des machines virtuelles qui utilisent cette configuration minimale, vous pouvez y aller les yeux fermés 😉</p>

<h3 id="modèle-de-langage-utilisé-dans-le-tutoriel---gemma31b-it-qat">Modèle de langage utilisé dans le tutoriel - gemma3:1b-it-qat</h3>
<p><strong>gemma3:1b-it-qat</strong> désigne un version légère et efficace du modèle Open Source <a href="https://deepmind.google/models/gemma/gemma-3/">Gemma 3</a> de Google:</p>

<ul>
  <li><u>1 milliard de paramètres (“1b”)</u>.</li>
  <li><u>Instruction-tuned ("it")</u> : Optimisé pour suivre des instructions et répondre de manière conversationnelle, <strong>ce modèle est idéal pour la génération de texte, le résumé et la traduction</strong>.</li>
  <li><u>Quantization-Aware Trained ("qat")</u> : Entraîné pour supporter la quantification (par exemple en 4 bits), ce qui <strong>réduit considérablement la mémoire nécessaire tout en maintenant une qualité proche des modèles plus lourds</strong>.</li>
</ul>

<h2 id="cest-comment-quon-fait--guide-étape-par-étape">C’est comment qu’on fait ? (Guide étape par étape)</h2>
<h3 id="ouvrez-powershell-en-mode-administrateur">Ouvrez PowerShell en mode administrateur</h3>
<ul>
  <li>
    <p>Clic-droit sur le menu Démarrer et sélectionnez « Terminal (Administrateur) » ou «Windows  PowerShell (Admin) ».
<img src="/content/images/pshell_adm.jpg" alt="" style="display: block; margin: 0 auto;" /></p>
  </li>
  <li>
    <p>Cliquez sur [Oui] pour accepter l’élévation de privilèges.</p>
  </li>
</ul>

<p><img src="/content/images/pshell_adm_uac.jpg" alt="" style="display: block; margin: 0 auto;" /><br /></p>

<h3 id="installez-un-instance-locale-ollama-installez-linterface-graphique-et-récupérez-le-modèle-gemma31b-it-qat-en-une-seule-ligne-de-commande">Installez un instance locale Ollama, installez l’interface graphique et récupérez le modèle gemma3:1b-it-qat en une seule ligne de commande</h3>

<ul>
  <li>Exécutez cette commande :</li>
</ul>

<figure class="highlight"><pre><code class="language-powershell" data-lang="powershell"><span class="n">winget</span><span class="w"> </span><span class="nx">install</span><span class="w"> </span><span class="nt">--id</span><span class="o">=</span><span class="n">Ollama.Ollama</span><span class="w"> </span><span class="nt">--accept-source-agreements</span><span class="w"> </span><span class="nt">-e</span><span class="p">;</span><span class="w"> </span><span class="n">winget</span><span class="w"> </span><span class="nx">install</span><span class="w"> </span><span class="nt">--id</span><span class="o">=</span><span class="n">FernandoMaclen.Hollama</span><span class="w"> </span><span class="nt">-e</span><span class="p">;</span><span class="w"> </span><span class="n">ollama</span><span class="w"> </span><span class="nx">pull</span><span class="w"> </span><span class="nx">gemma3:1b-it-qat</span><span class="p">;</span><span class="w"> </span><span class="n">shutdown</span><span class="w"> </span><span class="nt">-r</span><span class="w"> </span><span class="nt">-t</span><span class="w"> </span><span class="nx">0</span></code></pre></figure>
<p><br /></p>

<ul>
  <li>Une fois le paquet téléchargé et vérifié, le processus d’installation de l’instance Ollama commence, et l’interface graphique d’installation Ollama s’affiche.</li>
</ul>

<p><img src="/content/images/ollama_installer_ui.jpg" alt="" style="display: block; margin: 0 auto;" /><br /></p>

<ul>
  <li>Durant l’une dernières étapes de ce premier processus d’installation, l’installation du Redistribuable Microsoft C++ 2015/2022 peut s’effectuer de manière automatique s’il n’est pas présent sur le système.</li>
</ul>

<p><img src="/content/images/cpp_install.jpg" alt="" style="display: block; margin: 0 auto;" /><br /></p>

<ul>
  <li>À la fin du processus d’installation de l’instance Ollama, une fenêtre de bienvenue s’affiche. Vous pouvez cliquer sur [Finish] pour la fermer.</li>
</ul>

<p><img src="/content/images/ollama_welcome.jpg" alt="" style="display: block; margin: 0 auto;" /><br /></p>

<ul>
  <li>L’instance locale Ollama étant installée, l’installation de l’interface graphique Hollama s’effectue de manière automatique.</li>
</ul>

<p><img src="/content/images/hollama_installer.jpg" alt="" style="display: block; margin: 0 auto;" /><br /></p>

<ul>
  <li>Une fois ce processus d’installation terminé, le téléchargement du modèle <strong>gemma3:1b-it-qat</strong> sur l’instance locale Ollama se lance de manière automatique.</li>
</ul>

<p><img src="/content/images/gemma3_dl.jpg" alt="" style="display: block; margin: 0 auto;" /><br /></p>

<ul>
  <li>Une fois le modèle téléchargé, le système redémarre automatiquement. Une fois redémarré, vous pouvez alors constater que l’icône de l’application Hollama est disponible sur le Bureau.</li>
</ul>

<p><img src="/content/images/hollama_icon.jpg" alt="" style="display: block; margin: 0 auto;" /></p>
<h3 id="finalisez-linstallation">Finalisez l’installation</h3>
<ul>
  <li>Double-cliquez sur l’icône Hollama présent sur le bureau pour lancer l’interface graphique. Une notification du pare-feu Windows s’affiche, cliquez sur [Annuler] pour bloquer les flux entrants.</li>
</ul>

<p><img src="/content/images/hollama_fw.jpg" alt="" style="display: block; margin: 0 auto;" /><br /></p>

<ul>
  <li>Une fois l’application démarrée, celle-ci s’ouvre directement dans les paramètres de l’interface.</li>
</ul>

<p><img src="/content/images/hollama_ui.jpg" alt="" style="display: block; margin: 0 auto;" /><br /></p>

<ul>
  <li>Dans la section Serveurs, sélectionnez “Ollama” dans la liste déroulante “Type de connexion” puis cliquez sur [Ajouter une connexion].</li>
</ul>

<p><img src="/content/images/ollama_server.gif" alt="" style="display: block; margin: 0 auto;" /><br /></p>

<ul>
  <li>Cliquez sur [Vérifier]. Si tout va bien le message “La connexion a été vérifiée et est prête à être utilisée.” s’affiche dans un encart vert en haut de la fenêtre, et la case “Utiiser les modèles de ce serveur” se coche automatiquement.</li>
</ul>

<p><img src="/content/images/ollama_verified.gif" alt="" style="display: block; margin: 0 auto;" /><br /></p>

<h3 id="testez-un-premier-prompt">Testez un premier prompt</h3>
<ul>
  <li>Dans le menu de gauche, cliquez sur [Nouvelle session].</li>
</ul>

<p><img src="/content/images/hollama_new_session.jpg" alt="" style="display: block; margin: 0 auto;" /><br /></p>

<ul>
  <li>Validez que le modèle est présent dans la liste déroulante, écrivez votre prompt, cliquez sur [Exécuter]. Patientez quelques secondes, et voilà, magie 😀</li>
</ul>

<p><img src="/content/images/hollama_chat.gif" alt="" style="display: block; margin: 0 auto;" /><br /></p>

<h3 id="comment-télécharger-dautres-modèles-avec-linterface-graphique-">Comment télécharger d’autres modèles avec l’interface graphique ?</h3>
<ul>
  <li>Retournez dans les paramètres de l’application Hollama.</li>
  <li>Sous les paramètres de la connexion “Ollama”, cliquez sur le lien “Bibliothèque d’Ollama”. Dans la nouvelle fenêtre qui s’affiche, parcourez le catalogue de modèles disponible, copiez l’identifiant du modèle que vous souhaitez télécharger (exemple : <strong>qwen3:0.6b</strong>), puis fermez cette fenêtre.</li>
</ul>

<p><img src="/content/images/ollama_library.jpg" alt="" style="display: block; margin: 0 auto;" /><br /></p>

<ul>
  <li>De retour dans les paramètres de la connexion “Ollama”, collez l’identifiant du modèle dans la boite de texte “Tirer le modèle”, puis cliquez sur le bouton rouge pour lancer le téléchargement.</li>
</ul>

<p><img src="/content/images/ollama_pull_model.jpg" alt="" style="display: block; margin: 0 auto;" /><br /></p>

<ul>
  <li>Un message d’information s’affiche en haut de la fenètre pour montrer la progression. Le nouveau modèle est téléchargé et prêt à être utilisé quand le message passera au vert.</li>
</ul>

<p><img src="/content/images/ollama_model_ok.jpg" alt="" style="display: block; margin: 0 auto;" /><br /></p>

<ul>
  <li>Vous pouvez désormais choisir et utiliser ce nouveau modèle dans les sessions de conversation.</li>
</ul>

<p><img src="/content/images/ollama_model_list.jpg" alt="" style="display: block; margin: 0 auto;" /><br /></p>

<h3 id="si-besoin-supprimer-entièrement-les-composants-installés">(Si besoin) Supprimer entièrement les composants installés</h3>
<ul>
  <li>Ouvrez PowerShell en mode administrateur (<a href="#ouvrez-powershell-en-mode-administrateur">cf. 1ère étape</a>),</li>
  <li>Exécutez la commande suivante pour supprimer tous les composants installés (applications et modèles) :</li>
</ul>

<figure class="highlight"><pre><code class="language-powershell" data-lang="powershell"><span class="n">winget</span><span class="w"> </span><span class="nx">uninstall</span><span class="w"> </span><span class="nt">--id</span><span class="o">=</span><span class="n">Ollama.Ollama</span><span class="w"> </span><span class="p">;</span><span class="w"> </span><span class="n">winget</span><span class="w"> </span><span class="nx">uninstall</span><span class="w"> </span><span class="nt">--id</span><span class="o">=</span><span class="n">FernandoMaclen.Hollama</span><span class="p">;</span><span class="w"> </span><span class="n">winget</span><span class="w"> </span><span class="nx">source</span><span class="w"> </span><span class="nx">reset</span><span class="w"> </span><span class="nt">--force</span><span class="p">;</span><span class="w"> </span><span class="n">rm</span><span class="w"> </span><span class="nv">$</span><span class="nn">env</span><span class="p">:</span><span class="nv">USERPROFILE</span><span class="nx">\</span><span class="o">*</span><span class="nx">ollama</span><span class="o">*</span><span class="w"> </span><span class="nt">-R</span><span class="p">;</span><span class="w"> </span><span class="n">rm</span><span class="w"> </span><span class="nv">$</span><span class="nn">env</span><span class="p">:</span><span class="nv">USERPROFILE</span><span class="nx">\AppData\Local\</span><span class="o">*</span><span class="nx">ollama</span><span class="o">*</span><span class="w"> </span><span class="nt">-R</span><span class="p">;</span><span class="w"> </span><span class="n">rm</span><span class="w"> </span><span class="nv">$</span><span class="nn">env</span><span class="p">:</span><span class="nv">USERPROFILE</span><span class="nx">\AppData\Local\Temp</span><span class="w"> </span><span class="nt">-R</span><span class="p">;</span><span class="w"> </span><span class="n">rm</span><span class="w"> </span><span class="nv">$</span><span class="nn">env</span><span class="p">:</span><span class="nv">USERPROFILE</span><span class="nx">\AppData\Roaming\</span><span class="o">*</span><span class="nx">ollama</span><span class="o">*</span><span class="w"> </span><span class="nt">-R</span><span class="p">;</span><span class="w"> </span><span class="n">shutdown</span><span class="w"> </span><span class="nt">-r</span><span class="w"> </span><span class="nt">-t</span><span class="w"> </span><span class="nx">0</span></code></pre></figure>

<ul>
  <li>Une fois les composants désinstallés, le poste va redémarrer automatiquement.</li>
</ul>

<hr />

<h1 id="conclusion">Conclusion</h1>

<p>En quelques minutes, vous pouvez désormais expérimenter la puissance des LLM locaux sur votre PC Windows, sans abonnement ni dépendance au cloud. Que ce soit pour apprendre, obtenir de l’aide à la rédaction ou au codage, ou simplement explorer les dernières avancées de l’intelligence artificielle, Ollama et Hollama offrent une solution simple et accessible.</p>

<p>N’hésitez pas à tester différents modèles, à partager vos retours ou vos découvertes, et à contribuer à la communauté open source !</p>]]></content><author><name>Geoff RÉAU</name><email>contact@reau.ca</email></author><category term="Artificial Intelligence" /><category term="Tutorials" /><category term="Intelligence Artificielle" /><category term="IA" /><category term="Grand Modèle de Langage" /><category term="LLM" /><category term="Tutoriel" /><category term="Ollama" /><summary type="html"><![CDATA[Dans le post précédent, j’ai proposé des angles d’approche pour permettre au plus grand nombre d’appréhender les dernières innovations en termes d’IA. Maintenant, il est somme toute logique que je donne le bon exemple sous l’angle de la vulgarisation techno 🙂 Comme le suggère le titre du post, je vous propose un tutoriel rapide, simple et efficace pour installer votre propre instance de grand modèle de langage, ou LLM, localement sur un PC sous Windows en utilisant Ollama.]]></summary><media:thumbnail xmlns:media="http://search.yahoo.com/mrss/" url="https://www.reau.ca/content/images/ollama-tuto.jpg" /><media:content medium="image" url="https://www.reau.ca/content/images/ollama-tuto.jpg" xmlns:media="http://search.yahoo.com/mrss/" /></entry></feed>